Restoration of Paul's original
India Pattern Brown Bess Musket
By
John Fuhring
What, no video??? No, you are going to have to read and think., but there is detail here that will teach you more than any video can. I hope you find this essay interesting and enjoyable. This essay is presented to you free of charge and without any annoying commercials.  Paul's McEnroe's
Third Model or India Pattern Brown Bess
circa 1808 to 1818 Photo showing the gunlock, the wooden stock and the wrought iron barrel. (Lock, Stock and Barrel) Foreword
Before writing another word, I want to warn you that I am
not a
qualified gunsmith and there is nothing in the following essay that you
may take as "expert advice." This essay is simply a story of
how
I restored Paul's original Brown Bess Musket and is meant to entertain
you and is not meant as a "how to" manual for restoring your own
original or reproduction Brown Bess musket. If you are in the process of restoring a musket and are looking for information about how someone else has done it you may or may not find this article helpful. I hope that I have approached everything with common sense and with good and rational observations, but that is something you must decide for yourself. Since I am not a professional nor am I charging you anything, I am not responsible for your safety, especially if you don't understand what I am trying to say and you go ahead and do something foolish. If there is anything that you think is foolish or dangerous for you to attempt, don't attempt it, but write to me or seek out professional advice from a licensed gunsmith. Always error on the side of safety since the person responsible for your safety and the safety of those around you is YOU, yes you. I know that I have created a very wordy essay, but I hope it is an easy and fun read and it does have some nice pictures of a beautiful and wonderful historical artifact. Read what you want, skip around, look at the pictures. It's free, there is no password registration required and nobody is going to spy on you or charge you anything or make you watch annoying commercials, I promise. Introduction
This Brown Bess musket is a “third model”
otherwise known as
an “India Pattern” musket made after the East India Company introduced
improvements and they were later adopted for arms manufactured for the
British military. This pattern of musket is too late for the
American
Revolution, but was the main arm used in the Napoleonic Wars of the
early 19th Century and for use by numerous regiments and militia groups
throughout the British Empire.
Several millions of The Brown Bess were made in their various models starting in the early 18th Century and were used up until the middle of the 19th Century. These muskets had an extremely long life of service, but many people consider the French muskets (commonly, but incorrectly called 'Charlieville Muskets') were a stronger design and were made in greater quantities (something like 7,000,000 model 1777 were made) and they were made in French Government factories under close supervision with regard to quality. Unlike the French muskets, most Brown Bess models were made in private, for-profit, factories on the basis of who won the low bid. By the way, no government in Europe or America copied the Brown Bess, but all the States of Europe and the United States set up factories to make almost exact clones of the French muskets. Having said all that, the Brown Bess, without barrel bands, is sleek and looks more like a civilian gun than the French military looking muskets and the Brown Bess shot a larger and heavier lead ball. Finally, today all these muskets are somewhat rare considering how many millions of them were made, but the fact is, muskets quickly wore out in service and millions of them were scrapped for their metal or simply allowed to rust away in ship wrecks and junk piles. Important to us Americans is the fact that older model Brown Bess' were available to the American side of the War of Independence in very small quantities from militia armories and only at the beginning of the War and they were soon used up. We Americans don't like to admit it, but it was French money, French guns, French warships and French soldiers that allowed our little Revolution to be successful. The vast, vast majority of muskets used by American forces were supplied by the French, as were the vast majority of the cannons, the gunpowder, the uniforms and the gold to pay the soldier's wages, not to forget to mention the vast numbers of French soldiers (including my own ancestor) who lent their lives and military skills to the American Revolution. In fact, France was so eager to humiliate the British for their own earlier humiliation during the French and Indian War, their King literally spent the country into bankruptcy and eventually he lost his head because of it. It is entirely correct to call this firearm a 'gun,' a musket or if you want to get fancy, a fusil (pronounced fuse-ee) and I will use those terms interchangeably. It is NOT correct to call any rifled firearm a 'gun,' but in this case, since this musket is a smoothbore and it has no rifling, it may be called a 'gun' just as a shotgun is a gun. Because it is a gun and not a rifle, it is not nearly as accurate as a rifle at distances more than 25 to 50 yards. Anything beyond 50 yards and it is very unlikely that you'd be able to hit even a man sized target, much less within the "kill zone" of a deer. If any smoothbore would be used for hunting, it is my firm opinion that any shot 50 yards or more is unethical and should not be attempted. In line with the military tactics of the day, these weapons were designed to be pointed in the general direction of the enemy with the hope that volley firing would decimate the enemy (which it seldom did). By firing a "wall of lead" at an enemy, it tended to discourage a bayonet charge by men on foot and they were effective against cavalry too, not because just the cavalrymen would be hit (as in the movies), but the large, heavy lead balls would hit and kill the valuable and much larger targets, the horses, long before the cavalryman could swing his saber. I have .69 inch musket balls that will fit the bore of this gun and if patched with a thick greased patch to "take up the windage" (the difference between the bore and the bullet in a smoothbore musket) they should work very well. How these muskets were made then
and now
Back in the 18th and 19th
Centuries the original barrel tubes were made from a long "ribbon"
of wrought iron that was wound around an iron mandrel and while the
strip was
still red hot, it was hammered to weld the strip into a tube.
There are several videos showing how this amazing process can be done
by a skilled blacksmith. By
today's standards, this was a crude way of making a barrel and
therefore all barrels had to be proof tested to see if the welds would
hold. The barrel tubes that made it past the proof stage then
went on to work safely and reliably to this very day.
Actually,
these barrels were made by expert smiths who turned out hundreds of
barrels a day in huge workshops. Back in those days, steel making was a kind of a "black art" or perhaps a "blacksmith's art" and so every iron part of a gun was made out of wrought iron or started out as wrought iron. Wrought iron is an almost pure form of iron without any carbon in it to give it strength or hardness. Wrought iron can not be hardened by quenching in water, in fact, if you heat wrought iron and plunge it into water, it only gets softer because what little carbon it had is oxidized out of it. Wrought iron has slag and other impurities from smelting that tend to form layers within the iron and therefore wrought iron is not a homogeneous iron and is considerably weaker than even mild steel. Wrought iron is very easy to hammer into shape (thus the word 'wrought') and once formed, it is very tough, soft but tough. The surface of this kind of iron can be turned to steel by the process of "case hardening" or carburizing where carbon is added to the surface of the metal when it is red hot and then that surface is made super hard by quenching the red hot piece in water. The process of carburizing the surface of iron makes parts that are tough and hard, don't wear out and will spark when struck by flint. The case hardening process was well understood by the smiths of the 18th Century. During the period these muskets were made, the bore could vary quite a bit from .78 caliber down to .72 caliber and still pass the military inspectors at the factories. Exact bullet diameters were not important because the bullets needed to be undersized to fit in fouled musket barrels and in volley firing, accuracy wasn't at all important. Overall impression of Paul's
musket before restoration
There is no manufacturer's identification that I can recognize,
but there is the bare outline of the Crown and the British Coat of Arms
with GR (George Rex) stamped underneath in the usual place near the
center of the lock plate. The word “warranted” is stamped to
the left
of the cock in the usual place and what may be the remains of a maker's
mark to the left of that. It is my firm opinion that this was
a
privately made gun made to British military standards and sold to them
on inspection. The left top of the barrel near the tang has two deep
proof marks indicating that the musket was accepted for military
purposes. The barrel is a tiny bit over 41 inches long from
the muzzle
to the tang and is remarkably smooth inside all the way down the
bore.
The bore was found to be free of all but the most minor rust and
pitting.There are four semi-circular notches carved in the wood under the ramrod between the second and third thimble, two sets close together with a gap between them. It appears that when muskets were manufactured there was a lot of hand fitting and all the parts for each gun had identification marks that had to match when the gun was assembled. I now know the importance of extensively hand fitting parts and how replacement parts can not simply be “dropped in.” To assay the condition of the barrel, the barrel pins and the tang screw were carefully removed and the underside of the barrel was exposed. There was some rusting around the lugs that the pins go through, but it wasn't deep and easily brushed off after oiling. The barrel was lightly brushed, but not polished either on the top or the bottom. It was also noticed that there seemed to be a flaw in the wrought iron (perhaps a slag inclusion) at the very end of the muzzle resulting in a tiny crack in the muzzle. The lock plate was removed from the mortise hole (actually, it fell out because it couldn't be screwed in and so it wasn't). Inside the mortise was found the mainspring detached from the rest of the lock and that's why the lock couldn't be seated in the mortise. Once out of the musket's mortise, I had a good look at the inside of the lock mechanism and found that it was all there minus the trigger sear spring, but nothing worked properly. My next task was to remove the cock and then the inside bridle so I could take the mechanism apart for further examination. Upon disassembly of the bridle screws and removal of the bridle, I was noticed that the tumbler and the trigger sear were replacement parts and that they had been inexpertly fitted at some unknown, but modern period. It was found that all the screws were stripped and the trigger spring was missing. I put them aside for further work that will be described shortly. I then examined the overall look of the musket. The wooden stock is in remarkably good condition for the gun's age, but not as pristine as shown in many pictures on the Internet of original Brown Bess muskets. Someone had broken out a chunk of wood ahead of the trigger guard and had bent up the brass section ahead of the trigger guard. At first this was a great mystery why this area was damaged as it was, but more will be said about shortly. This musket has a “double throat” cock and that had me fooled so that, at first, I believed the cock to be from a French musket. I was under the mistaken belief that all Brown Bess musket cocks have a “swan's neck,” but later I discovered that many if not most of the India pattern muskets had this improved and stronger type of cock. Although similar to the French double throat cock design, the late British types have openings that are more plain, oval and symmetrical. Because of the shape of this musket's double throat, there is no doubt the cock is original Restoring the lock
mechanism to good operating condition
As mentioned earlier, the lock was not screwed
down in its
mortise hole and on removing the lock it was found that the mainspring
was inside and not in the lock where it should have been. I
think
we can assume that the mainspring was too difficult to install and was
simply stuffed in the mortise during the last attempt at
rebuilding. It was also found that all the screws were
stripped and so the ends were carefully
cold
forged at their ends to expand them into their original holes for a
tight fit.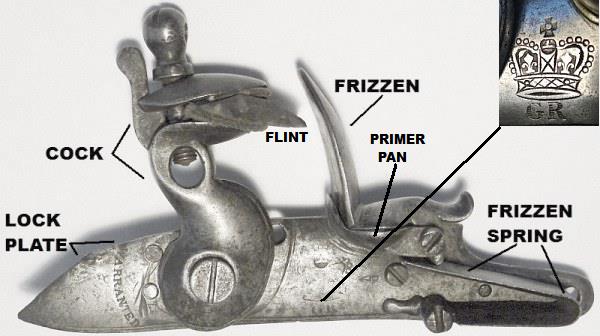 The double throated cock had me fooled into thinking it was from a French musket. This is a stronger improvement over the traditional "Swan Neck" cock and is found on most of the later India Pattern Brown Bess muskets.  This inside view shows the mainspring, the tumbler with the end of the mainspring riding on the tumbler's extension, the bridle that holds everything together and provides a rear bearing for the tumbler. To the right and below the right bridle screw is the trigger sear piece and above that is the trigger sear spring. If you look where the pan is, you can see a slightly deeper trough that was made into it at some period long ago. I made a similar trough in the pan of my modern reproduction of a French 1777 musketoon. 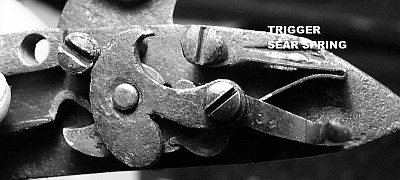 Inside of the lock showing the new trigger sear spring.
Upon examining the inside of the
lock, I noticed that the trigger spring was missing and so after many
tries, I
was able to successfully make one from a hacksaw blade that I
formed while red hot and then carefully
heat treated the part for springiness. To tell the truth,
I've
never had much luck making springs before and so I spent perhaps three
days in my workshop cutting, shaping and heat treating steel strips
before I succeeded in making a spring that had good tension, good
compressibility and wasn't so hard it would snap. I must say
that
this was perhaps the most frustrating part of the whole project, but I
learned a lot. After trying various thicknesses of steel, I
settled on a simple hacksaw blade, but after heating it so it could be
bent and filed to shape, the spring tension was poor. I had
several failures when I tried to harden the steel by quenching the
parts in cold water, but then I had the bright idea of carburizing the
steel with my hardening powder and then cooling the spring by blowing
cool air over it. I performed all the steps necessary for casehardening
the steel except for quenching in water. I performed two
carburizing steps, let the steel cool as described and put the spring
in the lock. To my great satisfaction the spring didn't
break,
but now had much more tension and just what was needed to operate the
trigger sear properly.
I then proceeded to take the entire lock mechanism apart. 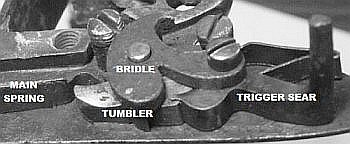 Major internal pieces of the lock. Mainspring, bridle, tumbler and the trigger sear piece. Notice that the tumbler shaft and bridle forms a bearing. Next it was noticed that the trigger sear piece was so thick on the bottom, it hit the wood of the mortise and that kept the sear from locking in at full cock. Reluctant to remove any of the original wood from the mortise hole, I extensively ground down the steel of the trigger sear so it would fit in the mortise while still leaving the part quite thick. 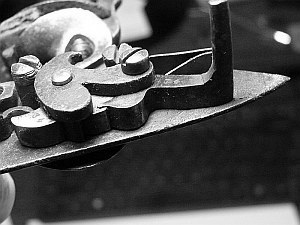 The vertical extension is part of the trigger sear piece that was heated and bent in so it wouldn't slide off the trigger lever mounted in the stock. This picture shows the trigger sear seated in the tumbler in the half-cock position and after the excess metal on the bottom was ground away to clear the mortise. 
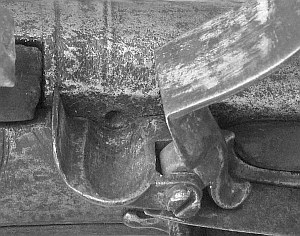
Mainsprings are always hard to work with, but I have a special tool for compressing them. The mainspring found inside the mortise hole does not have a hole in it for a screw, but being unwilling to modify this part, I made an antique looking screw that goes on the outside to cover the mainspring hole. I have no doubt that the mainspring is securely in its position and does not need a screw, so none was made for it. As mentioned earlier, the brass extension in front of the trigger guard was bent up and looked bad. The trigger guard was removed from the stock by removing the barrel tang bolt and two wood screws in the rear of the brass piece. The bent and deformed front end was carefully straightened out on an anvil flat using a plastic mallet so there would be no hammer marks. When it was replaced in its stock cutout, it fit perfectly. Also, as mentioned, there was a chunk of wood ahead of the trigger guard's front end missing. Later it was discovered that the end of the ramrod must go down in there and rest under the brass front end. To fix this, the ramrod's end was covered in shooting grease (so new filler wouldn't stick to it) and then the hole was filled up and stained with the ramrod in place. Apparently, at some time in the past, the ramrod was jammed into the gun with great force causing the small end to exit to the surface. This caused that chunk of wood to be broken out and the brass end of the trigger guard to be bent up and deformed. Anyway, the whole area is now looking as it should and the end of the ramrod is seated properly and you'd hardly know this area had been damaged. Finally, I very lightly recrowned the muzzle because the wrought iron at the tip had a crack (probably caused by an inclusion of slag common to wrought iron). I hesitated before recrowning the muzzle, but only a very small amount of metal (just a few thousands) needed to be removed and recrowning was a very common operation that armories and gunsmiths performed during this period. I am sure the tiny crack would not have propagated in the soft wrought iron, but any kind of a crack at the muzzle disturbed me and so I finally decided to lightly recrown the muzzle after which I proceeded to rust and otherwise make the newly recrowned muzzle look exactly like it did before (minus the crack). To complete the restoration of the lock to operating condition, the cock's jaw was fitted with a black English flint similar to the flints originally used in this gun. On testing, it was found that the flint and frizzen sparks remarkably well, throwing a shower of sparks that would easily set off the primer charge in the pan. Additional replacement parts
I hot forged sling swivels
from round steel stock and then rusted them. The front swivel
pin acts to hold the barrel to the stock and so it was felt especially
necessary
to make and install this part. With both sling swivels
installed and properly
rusted, the musket looks more complete, but they are easily removed if
so desired.I had a very hard time getting a replacement ramrod. The one I ordered from some company with 'Village" in its name finally came in after a very long and frustrating wait. My heart sank when I opened the package because the replacement ramrod was thick, really, really thick (0.275 inches). I wanted to then and there to send a nasty note to the guy who sent me this, but I thought to myself "what good would that do, I'd just get an unpleasant, curmudgeonly reply and I'd still be stuck with a useless ramrod (see, I really have mellowed in my old age). I don't always succeed, but I try to follow the principle: "is it true, is it necessary, is it kind" before saying or writing anything. In this case, the answers would have been: 'yes', 'maybe' and 'no' and so I just swallowed my frustration and anger and proceeded to take action that would give me no reason to be angry. Of course, there are companies out there with wonderful return policies and live by the motto, "if you like our products, tell your friends, but if you don't like our products, tell us," but you have to have some indication that telling them of your dissatisfaction would be welcomed and in this case, the "vibes" coming from this "Village" company just wern't right. Buy from and use their services at your own risk. So there I was, stuck dead in the water. I thought and thought about it and finally decided I'd try to file and machine the entire length down to about 0 .20 inches. If I failed, I'd be stuck with a damaged and useless ramrod, but the ramrod was useless anyway. I put the far end of the rod in my tiny lathe and started by machining down about an inch to about 0.20. I cut off the the part that was in the chuck so the .20 section would fit in the hole in the spindle then proceeded to machine down the next inch. Before I could do any of this, I had to heat the entire length of the rod inch by inch to red hot and anneal it by letting it cool slowly because the steel was so hard, it was impossible for me to machine or file it. Of course, all this was a lot harder to do than to tell about it and I spent the whole day and part of the next getting the ramrod to fit, but I finally succeeded. In fact, I succeeded a little too much because the steel was so soft that it bent easily, so I had to, inch by inch, heat and water quench it to re-harden it, but before that, I used a grind stone and hand files to take out the big machine marks and make it look like it was hand made, which it mostly is. When I was done, I "antiqued" the rod by heating it inch by inch and applying a browning compound that left the surface a nice rich rusty brown-black. Getting the ramrod to fit, re-hardening it and giving it an antique patina was a chore and I spent about a day and a half on this part of the project, but I'm pleased with the way it came out and now I can present the restored Brown Bess back to its owner and not be ashamed of my work. Yes, my workshop's air was blue with all the cussing necessary to complete the project, but I really enjoy working red hot metal using those "Black Arts" that the ancient iron smiths used and feel a special satisfaction when something difficult is overcome. Speaking of the Black Arts, I have a powerful gas torch, an ample supply of propane and make a little furnace of fire brick only when needed instead of the big mess of using a traditional coal forge.  The ramrod after cutting it down. The original diameter is near the middle, the diameter needed to fit in the musket is to the left and, of course, the tip is on the right. What a huge amount of work. I won't be buying anything in the "Village" any time soon, if ever. I should have stuck with Dixie. 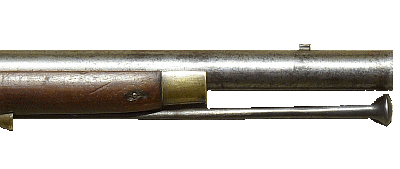 Conclusions and suggestions
It is my opinion
that this musket now has a well
functioning and reliable lock mechanism and that the wrought iron
barrel is in a condition that would safely allow light charges to be
fired from it if loaded properly with either a blank load or a .69 to
.72 lead ball. I recommend no more than 50 grains of FFG
powder in the
barrel and a lead ball should be patched with a greasy patch and firmly
rest on the top of the powder. Hearing and especially eye
protection
is a must.Just think of all the expressions we still use from the flintlock era. Today many people call the flintlock's cock a "hammer," but it is not a hammer and was called a cock because it resembled a chicken's beak. We still use the expressions "cock your rifle" and "going off half cocked" which means to rush without being really ready to do something or jump to conclusions without bothering to know the facts. The expression: "going off half hammered" is quite different than "going off half cocked" and I certainly hope you know the difference. We still use the expression "flash in the pan" to mean something that is spectacular, but doesn't last long or achieve anything beyond a big show. Hang fire is a common expression for the wait for something important to happen, but with unexpected delays. The word "ramrod" is still used as an expression for a leader or boss who pushes things along. "The fog of war" is an expression that really meant something when thick black powder smoke would obscure a battlefield. Finally the expression: "lock, stock and barrel" still means that everything is together and complete and nothing is missing. To shoot a volley may be even older than the musket era and goes all the way back to the bow and arrow days. I'm sure there are many more common expressions dating from this period and related to flintlock muskets. Finally, just think of the tremendous advancements that were made in military small arms between the time this musket was made (1808 - 1818) and the time my 1895 Mauser was made. In just 80 years small arms went from large caliber (.75) round balls fired from smoothbore wrought iron barrels to rifles with fast twist barrels and firing small (.28-.31) caliber long bullets with marvelous sectional density and a ballistic coefficient unheard of just a decade earlier. The Brown Bess was made during the "Age of Iron" when steel was a rare thing and not at all understood to the "Age of Steel" where high quality, very strong and homogeneous steel went into the barrels, receivers, bolts and other parts of a Mauser rifle. Cartridges went from paper tubes filled with black powder to cartridges made of brass and filled with advanced smokeless powder of a carefully chosen and specific burning rate so that the long bullets fired from fast twist rifled barrels had a range and accuracy that would have astounded anybody during the time of the Brown Bess. The ignition of the gunpowder went from a piece of rock making sparks against a steel frizzen to chemical primers contained in small primers that were part of the brass cartridge. Soldiers using my 1895 Mauser could fire their three aimed shots in 15 seconds and reload from stripper clips in just a few more seconds rather than the three shots a minute that a trained Brown Bess soldier could point and shoot at. As absolutely archaic and obsolete as this kind of firearm is, they still have a wonderful fascination for many of us who shoot them and especially for those who wish to have a beautiful historical artifact from this important era when so many things were happening in the world from the American Revolution to the defeat of Napoleon. An artifact such as this is a solid and tangible reminder and proof that these important historical events once happened and when we consider it, our ancestors were alive and lived through those events and, in my case, actually took part in them. Paul's Brown Bess is a wonderful artifact and now that it is back in working order and ready for battle, I can not see how he'd not be very proud to own such a marvelous thing. 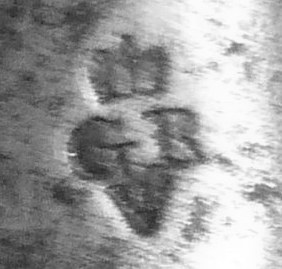
 Proof marks on the
barrel.
 The primer pan with
the frizzen open and showing
the touch hole. It is hard to see, but a small and deeper trough was made near the touch hole. The frizzen throws a nice shower of sparks now that the rest of the lock is working. THE END
(for now)
If you have any detailed comments, questions, complaints or
suggestions, I would be grateful if you would please
E-mail me directly If you liked this story, you might be interested in more flintlock stories starting with an overview of flintlock shooting. 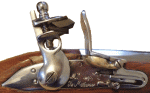 Shooting the flintlock firearm If you'd like to see what the French cavalry was using during the American Revolution and the Napoleonic Wars, please visit my story about how I improved my  French Model 1777 Cavalry Musketoon made in India  You might be interested in how I recently rebuilt my friend Paul's flintlock Restoring Paul's original India Pattern Brown Bess  The Defarbation of the Trapper Flintlock Pistol or how I made my pistol look and perform like one of the 18th Century's best  How I took two caplock pistols and made them into identical 18th Century flintlock dueling pistols If you like more "modern" Civil War revolvers, you might like to read one more of my  Black powder revolver articles. or you can go to my shooting articles selection page There are lots of other things here you might be interested in and no commercials Please go to my Home Page for more exciting adventures. |