Converting the Crockett Caplock
to a Flintlock By
John Fuhring
What, no video??? No, you are going to have to read and think., but there is detail here that will teach you more than any video can. I hope you find this essay interesting and enjoyable. This essay is presented to you free of charge and without any annoying commercials.  My Crockett caplock pistol before being transformed into a very hansom 18th Century flintlock dueling pistol. The caplock is replaced with a flintlock, the drum is removed and a touch hole insert goes where the drum was. This is actually a nicely made and accurate .32 caliber caplock pistol, but it had several things about it that made me less than proud to show it off to people. Still, I thought the pistol's overall shape gave it great potential to make into something I would be proud of.  Perhaps a flintlock isn't everybody's "cup of tea," but for me, this pistol with its "farby" stampings removed and polished "Armory Bright" and looking like it came from the 18th Century, is a much more hansom pistol and one I'm proud to own and show. Foreword
Before writing another word, I again want to warn you that I
am
not a
qualified gunsmith and there is nothing in the following essay that you
may take as "expert advice." I hope that I have approached
everything with common sense and with good and rational observations,
but that is something you must decide for yourself. Since I
am
not a professional nor am I charging you anything, I am not responsible
for your safety, especially if you don't understand what I am trying to
say and you go ahead and do something foolish. If there is
anything that you think is foolish or dangerous for you to attempt,
don't attempt it, but write to me or seek out professional advice from
a licensed gunsmith. Always error on the side of safety since
the
person responsible for your safety and the safety of those around you
is YOU, yes you.The purpose of this essay is to tell the story of how I took a unpopular and dumb looking .32 caplock pistol and turned it into a beautiful and fully functional flintlock. This story is to entertain you and perhaps encourage you to do something similar if you have a caplock rifle or pistol that you'd like to convert to a flintlock. If you find that I have made any serious mistakes or something doesn't work for you, please write me at my geojohn mail address and not in my guestbook and tell me about it. The last thing I want to do is spread bad information about black powder shooting because, quite frankly, there is already way too much of it out there as it is. In writing this essay I am assuming you are interested in flintlocks, know how they work and how to adjust them for good sparks. If you are unfamiliar with the wonderful world of flintlock shooting, you might be interested in reading about them in my flintlock page linked to at the end of this essay. Assuming that you are an experienced black powder shooter with some knowledge of flintlocks, you know that a well maintained flintlock is a reliable shooter, but a difficult mistress that requires a huge amount of attention. There is no way a flintlock is as easy to maintain as a caplock so if all you are interested in is loading and shooting with the charge guaranteed to go off every time, a flintlock conversion will not make sense to you. If you are like me and love the challenge of getting down and really primitive and having a "Shooting Iron" that would fit in the gunroom of an 18th Century gentleman, highwayman or sportsman, this story is for you. I want to say something about the technical skills necessary to change a caplock to a flintlock. Flintlock mechanisms are much more complicated than a equivalent single shot caplock. To convert a caplock you must have or want to develop several different skills and you must have some basic tools and a workshop. You will need files and polishing wheels, a hacksaw, a power drill and a small power sander and it really helps to have a small lathe although not absolutely necessary. I know that I have created a very wordy essay, but I hope it is an easy and fun read and it does have some nice pictures. Read what you want, skip around, look at the pictures. It's free, there is no password registration required and nobody is going to spy on you or charge you anything or make you watch annoying commercials, I promise. Introduction
Many years ago I bought a little Pietta .32
Remington Pocket
Pistol reproduction, but was greatly dissatisfied with it. My
chances of hitting anything smaller than a barn door at 10 yards were
slim to none. I mean, the little revolver, cute as it was,
just
could not shoot with any precision or accuracy and I got to just hate
it. I spoke to the gunsmith at Dixie Gunworks and he agreed
with
me the Pietta reproduction of the Pocket Pistol was hopeless so he
generously offered to exchange it (along with a little extra cash) for
a much better shooter. The gunsmith didn't tell me what he
was
going to send me, but assuring me that I'd really like it.
When
it came I was surprised and delighted that it turned out to be a
"Crockett .32 muzzleloading caplock with a nicely rifled barrel.
I was a little disappointed that it was just .32 caliber,
but otherwise it was a good precise shooter as promised.There were certain things I really did not like about the pistol. First, on both sides of the barrel there was stamped the most absurd and lengthy instructions and warnings. I mean they were just horrible and extremely "FARBY" looking. With a whole Encyclopedia Britannica chapter stamped into the barrel, I was ashamed of the thing. 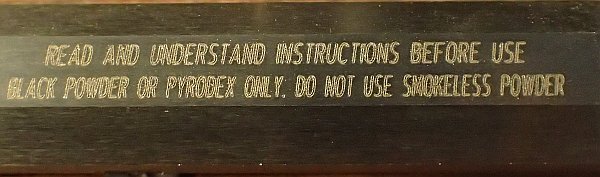 Ugly "farby" lettering on the left-top side of the barrel. Traditions ruined the 19th Century look with this ugly lettering right on top where everybody can see it. 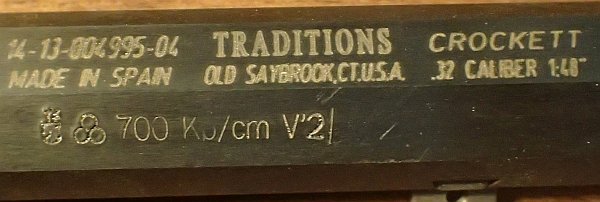 These stampings are so utterly out of place on what is supposed to look like an early 19th Century pistol, I simply can't understand why Traditions put them there. Proof marks on the lower flat are mostly covered by wood so they weren't removed. The second thing I didn't like about the pistol was the finish of the barrel. It was not polished very well and was blued almost black instead of a more hansom brown as per the period it was supposed to represent (early 1800's). Another thing I really did not like was the silly shape of the hammer. It's just me, but I really did not like the way the hammer was shaped and would have greatly preferred a more conventional and plainer looking hammer. When I'd take my .44 caliber revolvers and my other black powder rifles and guns to the range, I'd take the Crockett too and shoot a few rounds, but it was never very exciting compared to the smoke, flame, roar and recoil of my larger caliber firearms. After a while, I started wishing the pistol would have been a flintlock because then it would be more of a challenge to shoot and would look really great as only the 18th Century flintlocks can. Finally I put the Crockett pistol away and sort of forgot about it since I had other black powder and cartridge firearms I wasn't embarrassed to show and were more fun to shoot. Converting the Crockett from a
caplock to a flintlock
A year or so ago I came across my Crockett pistol in a
drawer,
took it out and took a
hard look at it. I had recently been doing a lot gunsmithing
and
fine
tuning an Indian made 1777 cavalry musketoon (see link at the
bottom of the page) and it
occurred to me that I had the tools, machines and skill to convert my
Crockett to a flintlock. The flintlock fever was on me and if
would make the conversion, I knew that I would greatly enjoy owning,
showing and shooting my Crockett. The first thing I did was
to
see if the Trapper's lock would fit into the mortise of the Crockett
(with the barrel out) and if the future touch hole of the Crockett
would line up with the pan of the Trapper's lock.
The size
was perfect, the lock dropped right in the mortise and I was
happy
to note that the alignment of the touch hole with the pan would be
perfect once the drum was removed and an insert was made for the
barrel. As mentioned, I really detested all the printing on the top sides of the barrel and I didn't like the blued finish so I attacked that part first. First I took a small hammer and I peened down the stampings until the barrel was smooth and then I used some rather coarse files to completely remove the printing. I used a fine file to get the barrel as smooth and shiny as possible. I then proceeded to sand and polish the barrel to remove all tool marks and give it an "armory bright" finish such as was common in the 18th Century. By the way, when ordinary steel is polished this way, its surface is somewhat "passivated" and it is almost as protected from rust as a blued steel finish. I have found that a shiny steel surface requires no more attention and care than a blued steel surface to keep it rust free. This "improvement" took a long time and I went back to it several times when I'd become dissatisfied with my workmanship, but finally I got the barrel looking like I wanted it to look. Boy, what an improvement and I was so proud of the way the Crockett's barrel now looked, I did the same thing to my Traditions Trapper pistol that had the same ugly stampings on its barrel too. A good set of files, fine wet/dry sandpaper (600 grit to 2000 grit) and a sanding machine really helps, but even with those, the task is a long one. Once I got the barrel of my Crockett refinished, I got really excited about the prospect of turning it into a flintlock so I contacted Traditions and they kindly informed me that a Trapper flintlock plate was available from them at a reasonable price. I steeled myself, put the Crockett's drum in my vice and proceeded to twist it off. The drum was in there surprisingly tight and I had to use a lot of torque to finally unscrew it. 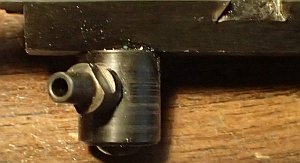 Caplock drum attached to rear of the barrel.  Drum removed showing the 10MM threaded hole the insert will go into. When the drum was out, I measured the screw hole size and found it to be 10 MM. Of course, there are no touch hole inserts for this size of hole so I went down to the hardware store and bought an ordinary steel 10 MM bolt. For making the touch hole insert, these are the steps I performed: (1) I screwed the steel bolt all the way down into the hole where the drum had been and then marked it to about where a cutoff piece would be flush with the barrel flat. (2) On removing the steel bolt, I hacksawed the end off, and thus created a piece that would become the touch hole insert. (3) I made a screwdriver slot in the sawed off end of the piece and screwed it into the barrel until it was tight. (4) I then carefully filed down the excess steel until the piece was nearly flush with the barrel. (5) I took the piece out and carefully removed metal, put it in again until the piece was indeed flush with the barrel's flat. (6) I then put the insert into my little lathe so I could bore it. I started with a 1/16 drill bit from the outside and bored a hole 1/16 deep. From what would be the inside, I bored a 3/16 hole until I could see daylight and then drilled a tad deeper. (7) I made sure the screwdriver slot was deep enough and then screwed the insert in snugly. With a marking pen, I marked, where the insert lined up with the muzzle. (8) I unscrewed the insert, noted the mark that lined up with the muzzle and then I cut a 0.1 inch slot in the bottom of the insert so the slot would line up with the muzzle. (9) I enlarged the slot to about 45 degrees so that when the pistol is loaded, gunpowder can get inside the insert and be right next to the small touch hole for rapid and reliable ignition. (10) I put shooting grease on the threads so the insert would be easy to remove and then screwed it down snugly. 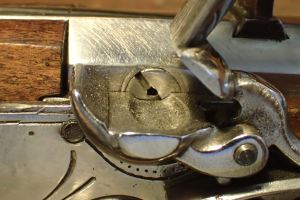 Touch hole insert showing alignment with the pan. With the insert successfully installed and the Trapper lock fitting perfectly, I put in a blank test charge, cocked the pistol, pressed the trigger and the piece discharged almost instantly proving that the conversion was a success. I then contacted Traditions and ordered an identical flintlock lockplate and put the Trapper's lockplate back in. When the lock arrived, I adjusted many things including the mainspring, removed the "fly" and polishing up the friction surfaces until I had the lock operating really well. For a long time I was really happy with my "new" Crockett flintlock pistol. Well almost.  Why are we never satisfied? Well, I didn't like the contrast between the highly polished barrel and the darkness of the color casehardened lock. Finally I "bit the bullet" and took the lock apart and then began to polish the plate and all the external parts including the cock, frizzen, pan and plate until they were shiny. With all the polishing, I just love how the lock looks and in addition, I just love how the Crockett has been transformed. Converting a Second "Crockett"
for a "18th Century Dueling Pistol Set"
When I had my pistol converted and polished
"armory
bright" and all those "farby" stampings removed, I very, very much
liked the way it looked and so I tried to order a second
Crockett
caplock pistol so I could convert it and have a matching set
of
dueling pistols that any
gentleman
of the 18th Century would be proud to own. Unfortunately the
Crockett model was never popular and it stopped being sold
some
years
ago. That is too bad because it is my opinion that if it had
been
offered as a flintlock, it might have been a success. I finally found a caplock Crockett for sale at a auction site down in Florida. I put in a reasonably high bit and won the auction and so I was able to pick up a second Crockett caplock at a more or less reasonable price. It turned out that the Crockett was brand new and it looked like it had never been fired. It took weeks for the auction to be over and for them to finally send me the pistol, but on Tuesday January 2, 2017 the pistol arrived. While waiting for the pistol, I bought a "orbital" sander and cleaned my mill files, cut a piece for 10 MM bolt to the right length (for the insert) and assembled the tools I'd need. When the pistol finally arrived, I immediately began working on it. The first thing I did was to unscrew the drum and knock out the front and rear sights so I could work on the barrel. Of course, all that ugly and "farby" lettering just had to go, but this time I knew what I was doing and the barrel was quickly filed with minimum scratching and the orbital sander was much quicker and did a better job at removing scratches without creating new ones. After the barrel was sanded relatively smooth, I began to hand sand it with very fine sand paper and then I used a polishing wheel with a hard steel polishing compound to give it that "Armory Bright" finish that looks so good. I worked about 4 hours on the barrel which was considerably shorter than the time spent on the first Crockett conversion I did. The very next day I received a flintlock mechanism from Traditions and began work on it too. First thing I did was to completely take it apart down to the last screw. I removed the little "fly" piece in the tumbler because for this pistol it is not necessary and only slows down the fall of the hammer. I polished some of the parts so they would work better and then I proceeded to polish the lock plate, the cock, the frizzen and the flash pan to mirror brightness just like the other pistol's lock plate is. This took me another 4 hours of work, but this time I knew what I was doing and the work went faster than before. The frizzen of my earlier pistol was too soft and I had to harden it with my torch and hardening compound, but this new frizzen was plenty hard and so I didn't have to do anything to it. To get the lock to fit in the mortise properly, I had to do a little grinding with a Dremmel tool to remove small amounts of wood, but the biggest fit problem was the trigger mechanism. The trigger mechanism was too high and it contacted the sear bar preventing the tumbler from going into half cock or full cock. I took metal off as shown in the photo below until the rear bar of the trigger sear piece just cleared the bar without excess play. Of course, I did not want a sloppy trigger, so I took off just small amounts of brass and tried it each time until it was right. This was a bit tedious putting the lock in, testing it and taking it out again, but its the only way to get things right. Making the steel threaded insert was straight forward. I put a piece of steel 10 MM bolt in my little lathe, trued up the ends and then bored the outside with a 1/16 inch drill bit about 1/16 of an inch into the steel. I then cut a screwdriver slot with a hacksaw blade across the face of the outside face of the insert using the hole to center the slot. Next the insert was reversed and the inside end was bored with a 3/16 drill bit until I could see light through the insert and then bored it just a bit more until I had a nice clean hole to the outside that was 1/16 inch diameter and a bit less than 1/16 inch thick. Finally I screwed the insert in snugly, marked where the front of the barrel was relative to it, removed it and ground a deep notch so that powder could get inside and next to the powder in the primer pan for quick ignition. With the two pistols assembled, good sparking flints in the respective jaws of each cock and with a good charge of powder and ball, these pistols are ready to shoot. When I was all done, I took some fine steel wool and polished the wood finish and then stood back and admired a dueling pistol pair that any 18th Century gentleman would be proud to own, show and shoot.  My Flintlock Dueling Pistols "Mind your tongue sir or you will meet me on the Field of Honor!" THE END
If you enjoyed this story, you might also be interested in the following articles and stories.  My French model
1777 cavalry musketoon flintlock
After some extensive, but very fun work correcting a lot of minor things, I am very proud of this gun.  Paul's original Brown Bess I rebuilt All modesty aside, I am very pleased with how this gun turned out.  Shooting the flintlock There are lots of other firearm articles one of which you might be interested found in my shooting articles selection page
If you have any detailed comments, questions, complaints or
suggestions, I would be grateful if you would please
E-mail me directly There are lots of other things here you might be interested in and no commercials Please go to my Home Page for more exciting adventures. |