|
Important
safety warning regarding the EC-1,
As they are
wired from the factory, hot chassis radios
are deadly dangerous and you shouldn't even plug them in until they
have been made safe. These radios have
what is called a "hot chassis," and that makes them very dangerous to
work on or even to plug in. Do not attempt
to test or repair them until
you or a skilled technician have rewired them
as I will describe below. I can not emphasize too strongly
how important it is that you follow my advice because over the years,
many people have been
killed by "hot chassis" radios and many others have received painful
shocks. The fact is, the modifications I shall describe are
not
only very effective, but are quite
easy to do and will cost you less than $10, so there is no excuse for
not
doing the work. the S-38 and S-38b Hallicrafters Radios an essay by John Fuhring This warning includes any "hot chassis" radio of similar design (including many of the famous "All American Five" radios). This warning does not apply to some late model AA5 radios that were designed with an "isolated return bus" (-B bus) so be sure your radio actually has a "hot chassis" before trying to modify it. You can tell if your radio has a "hot chassis" or not by running some simple tests detailed in the text below. WARNING STATEMENT Why are these radios so dangerous? Depending on which way their original unpolarized plug is plugged into the wall socket, the chassis of these sets have a 50/50 chance of being "hot" if turned on and a 50/50 chance of being "hot" if simply turned off. On or off, the chassis will be hot at some point and you will get a bad shock if you simply touch the insides of the radio. To make matters really deadly, if the grommets that insulate the chassis from the outside case are in bad shape, you will get electrocuted just touching the radio. How did Hallicrafters and other manufacturers of "hot chassis" radios get UL approval to manufacture and sell such dangerous radios? Back when these radios were new, there were no polarized wall sockets and power plugs so radio manufacturers made them safe by insulating the case from the chassis with rubber grommets or by putting the chassis in wooden/plastic cases. All these radios had Masonite rear covers that prevented probing fingers from touching the chassis and they all had bold warning labels telling you NOT TO TOUCH THE CHASSIS OR CHANGE THE TUBES WITH THE BACK OFF AND THE SET PLUGGED IN. The warning labels said that the set was to be worked on only by a Trained Radio Technician (who knew what a "hot chassis" was). We can't trust the old safety devices anymore because the insulating grommets have deteriorated with age and the Masonite backs of most of these old radios are now missing. Even if they were still there, the warnings that were printed on the backs of these radios are equally useless because The Trained Radio Technician profession has been extinct for decades (with only a few of us old dinosaurs left). Today we have to be our own "Trained Radio Technician" and the truth is, most of us aren't "trained" and most of us don't even know what a "hot chassis" is. The whole idea of this essay is to give you the training you need to make your radio safe before you try to fix it or use it. DOES YOUR RADIO HAVE A "HOT
CHASSIS" OR NOT?
As mentioned,
some All American Five (AA5) radios are safe to use without using a
polarized plug and without rewiring the on/off switch, but only if they
were designed with an isolated bus. Just
looking at the chassis won't tell you anything unless you really know
what to look for.
If you have a good schematic of your radio and you know something about schematics, you can tell by carefully looking at the schematic. In
radio electronics there are two common symbols for
"ground" (or "return").
Perhaps the most common symbol is the triangle with lines shown below: 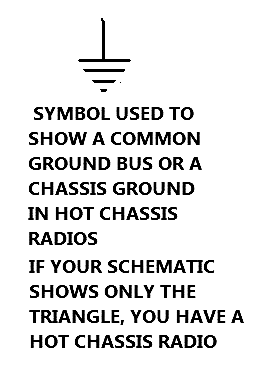
The other common ground symbol looks like a crow's
foot as shown below:
 If you have a hot chassis radio, the triangle ground symbol is usually the only one shown, but if you see both the triangle and the crow's foot, you have a later radio with an isolated ground bus. The
other test is actually more positive and you don't need a schematic for
it or skill in reading schematics, but:
The following test
assumes you have a ohmmeter and know how to use it
The best
way to tell if your radio has
a hot
chassis is to take an ohmmeter and set its scale to read 20K ohms or
greater. Unplug your radio, but turn the on/off switch to the
'ON'
position.
Measure the resistance from a blade of the power cord to the
chassis. After you get a reading, read from the other blade
to the chassis. If BOTH
readings are greater than 20K Ohms (off scale), then your radio
has one of these isolated buses, it is intrinsically safe and you don't
need to
install a polarized plug or rewire it. BUT
If you get a low reading on either blade to chassis, your radio is dangerous
and you should follow the instructions below. If your radio failed the test above, but already has a polarized plug installed, put the on/off switch in the 'off' position change your ohmmeter to the lowest scale (usually the 200 ohm scale) and then measure the resistance from the wide blade to the chassis. If the reading is high (more than a few ohms), your radio is dangerous and you should follow the instructions below. On the other hand, if the resistance from the wide blade to the chassis is a few ohms or less with the radio's switch on and likewise a few ohms or less with switch off, somebody has already wired it up for safety. As a double check, test the resistance between the narrow plug blade and the chassis with the radio turned off. If the resistance is low (a few ohms) with the radio turned off, you have a hot chassis. If your radio passes all tests and has a late model isolated return bus, you can still get a slight "tingle" from it. If you have a Hallicrafters S-38c (or later), a S-120 or a late model AA5 radio that you have tested and confirmed that it has an isolated chassis, it is not necessary to rewire it for safety. BUT--- Please be aware that you still might get a painful "tingle" from touching the chassis of these radios. If that "tingle" bothers you, you can get rid of it by using a polarized plug and rewiring the on/off switch, but that will be the subject for another article. (I'll provide a link to that article when I've posted it) In the meantime, below is a schematic of a late model AA5 radio that has had its AC section modified to "tingle proof" it.  Making later AA5 radios "tingle proof" (note that both ground symbols are shown) OK, let us assume that your radio has failed, it has a hot chassis and needs to be made safe, here's what you do: MAKING
YOUR RADIO SAFE
Below
are shown
schematics
detailing
what must be done to make these radios safe. The power cord
plug
must be replaced with a polarized plug AND the
ON/OFF switch must
be rewired. Simply replacing the power cord with a polarized
plug
without rewiring the switch is worse than doing nothing. These
tasks are to
be performed only by technicians who understand AC wiring and who can
read
schematic diagrams. If you are untrained and have no
experience
working with high voltage electrical circuits, don't even try the
following or you may be killed. Wiring up these
radios
incorrectly is
as bad or worse than having them in their original configuration, so be
absolutely sure of what you are doing and have somebody else check your
work, if at all possible.
As mentioned, the modifications I'm suggesting are quite
easy to
do and very
cheap. I urge you to make your radio safe before working on
it
or, if
it is already working, stop using it until after you have made it safe.
All you will need is a soldering
iron and a replacement power cord with a polarized plug. An
inexpensive extension cord you can buy for less than $10 new will work
fine once you cut the socket end off.
PROCEDURE: (1) The first thing you must do is remove the old AC power cord. I would suggest you cut the old cord off as near to the chassis as you can and leave short stubs of the old AC cord attached to their original termination points for the time being. (2) Next, unsolder the old power cord stub from the termination point that that is wired to the ON/OFF switch. It is usually an unused pin on the 35Z5 rectifier tube with a wire going up to the ON/OFF switch. Solder in its place the new power cord wire that goes to AC Line (AC "hot"). The AC Line is the narrow blade of the AC plug. After you have done this, take an ohmmeter and double check that one side of the ON/OFF switch is now connected to the narrow blade of the AC plug. (2b) As an alternative, you can discard the wire going from the termination point mentioned above and solder the power cord's AC Line wire directly to the ON/OFF switch after you've removed the jumper wire. (3) On the other side of the ON/OFF switch, trace the wire to where it is soldered to a lug that is connected to the chassis. Unsolder that wire at the chassis so that it is no longer connected to the chassis. You will move that wire as described in step 4 below, but remember where this lug is because you will solder to it in step 5. (4) Unsolder the other old AC line cord stub from the where it is terminated on the rectifier tube socket. This is the termination point that has the 330 ohm resistor on it, a wire from the lamp and is jumpered over to pin 2 of the 35Z5. Solder on the wire from the ON/OFF switch from step 3 above in its place. It is extremely important to rewire the ON/OFF switch as described and shown in the second diagram below. You must not leave the ON/OFF switch in its original configuration with one side connected to the chassis. (5) The AC Neutral wire from the polarized plug (wide blade) must now be directly soldered to the chassis lug that formerly had the ON/OFF wire on it (step 3) so that AC Neutral is hard-wired directly to the chassis as shown in the second diagram. With a ohmmeter, confirm that the wide blade of the plug (the AC Neutral) is connected to the chassis regardless if the ON/OFF switch is on or off. (6) Many radios have a jumper between the left (ground) side of the volume control potentiometer to the on/off switch. If your radio has this connection, you must remove the connection -- by no means leave the potentiometer jumpered to the on/off switch. The ground side of the potentiometer must now be grounded to the chassis using its own jumper wire. Pick a nearby chassis ground lug (perhaps the same one one you just soldered to) to ground the volume control potentiometer lug. With a polarized plug and the AC Neutral side connected directly to the chassis, you are guaranteed a "cold" chassis that is safe to touch even with the set plugged in. Be sure to double check and make absolutely sure that AC Neutral is connected to the chassis as shown in the lower diagram and not AC Line voltage by mistake. If you make this mistake and AC Line voltage is connected to your radio's chassis, your chassis will be always "hot" and your radio will be even deadlier than before. (7) For EC-1 radios, you should check the chassis-to-case insulating grommets for deterioration. These are standard large size grommets that are available at most hardware stores. Make absolutely sure there is no direct (DC) connection between the chassis and the metal outer case of your radio. As a final safety check, you should connect an Ohmmeter between the chassis and the case. With the Ohmmeter set to its highest range, you must measure 500 K Ohms or more. That's all there is to it. If you did everything right and you didn't skip any steps, you now have a very safe radio and you may go ahead and plug it in with confidence. 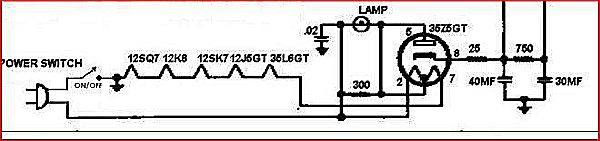 ORIGINAL (deadly dangerous) FACTORY WIRING Original wiring showing how AC line voltage may be switched on to the chassis if plugged in one way and how AC line voltage will be wired to the chassis through the filament string if the set is turned off. This is an extremely dangerous situation and you must rewire your set as shown below before you attempt to work on the radio, open the back to change a tube or even play the radio. 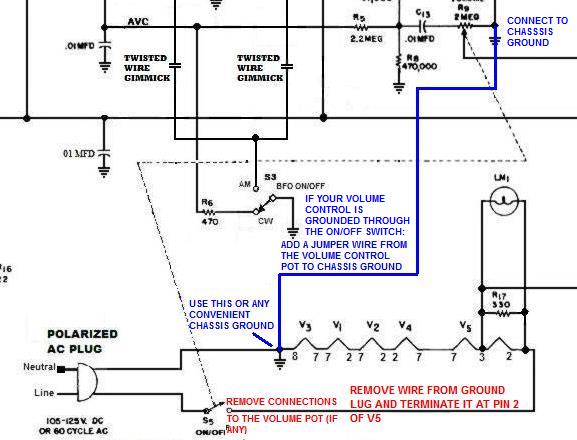 NECESSARY WIRING
CHANGES
Notice that a
polarized plug
was installed and the on/off switch
has been moved. With the chassis always at AC Neutral and the
on/off switch connected to the AC Line voltage, the
chassis will always
be
safe.
Be ABSOLUTELY sure the
AC
socket in your house is wired
correctly, never try to defeat the polarization of the
plug and
never use an
unpolarized extension
cord or adaptor.
If you are unsure of your house wiring, test it if you are
qualified or get an electrician to check it out. If these drawings
simply look
like chicken scratching to you, it's pretty
obvious that you
don't know
enough about schematics or radios to attempt
these
modifications on your own and you
need to
call an expert.
It is not
really necessary, but it
would be even safer if a three wire
plug was used with the ground wire connected to the outside case.
I did this for my EC-1b, but just for "feel good" reasons.
If you use a three prong plug, there will be fewer sockets you can plug
into and you may have to use an adapter which, if not plugged in right,
will make your radio dangerous.
If you don't understand how to do this and you don't know about AC wiring, please take your radio to somebody who understands these things and who can rewire the radio for you. Do not operate the radio until you have made these modifications and don't operate your radio until you have had all modifications checked and rechecked to make sure the wiring was done right and the radio is indeed safe. I am pretty sure that all houses built after the mid 1950s have polarized wall sockets. If a polarized plug won't go into a socket no matter which way you try it, you have an old fashioned socket and you must have a qualified electrician replace it with a modern polarized socket. NEVER, NEVER, NEVER DEFEAT THE PLUG'S POLARIZATION BY USING AN ADAPTER OR EXTENSION CORD THAT ISN'T ITSELF POLARIZED. Just imagine how deadly dangerous that would be. This is so important,
so let me repeat:
Please be warned, if the wiring is done incorrectly or your AC socket is miswired or if you are using an unpolarized extension cord, the radio will remain deadly, so: (1) Use
only a modern
polarized plug.
(2) Make sure your wall socket is wired correctly (3) Make sure this modification is done right by carefully testing each plug blade to the chassis for high resistance with the radio both on AND off . 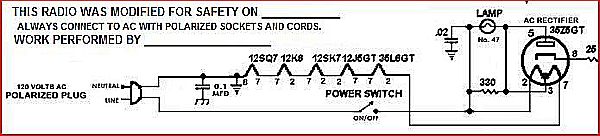 One
more thing.
You might want to print out this diagram and paste it to the bottom or to the back of your radio. It will be a reminder to you or anybody who might own it or work on the radio in the future that it has been made safe. NOTES
Please note that the large opening in the
AC socket is the Neutral and
the small opening is Line. The large blade on the plug is the
Neutral and the small blade is Line. If you connect a AC volt
meter between
the large opening and ground, you should measure very little voltage,
but if you connect between the small opening and ground, you should see
115-120 Volts AC. Be sure your meter is set to measure AC
volts.
For just a few dollars, you can buy a nifty little device
that
plugs into your wall sockets. This thing has lights on it
that
will tell you if your sockets are not wired correctly. If you
have installed the sockets in your house yourself or if you don't know
if your sockets were installed by a professional electrician, I urge
you to test them with a AC voltmeter or one of these nifty little
testers. additional suggestions and warnings One excellent way of checking your radio after modification is to connect an AC volt meter between a ground and the chassis. The voltage should be zero (or just a few volts) regardless if the set is turned on or off. Turn off the radio and check the chassis to ground. If you are showing 110 AC or more, you have a serious miswire and you need to unplug your set and recheck your work. Turn on the radio and check the chassis to ground. If you are showing 110 AC or more, you have a serious miswire and you need to unplug your set and recheck your work. Another warning regarding these radios: The indicator lamp is at AC Line voltage "hot" so be sure the set is turned off or, better yet, unplugged before you remove and replace the No. 47 bulb in its socket. By the way, after all these years, the rubber insulation on these wires gets rotten and the wires get dangerously exposed. Bare wires with cracked and peeling insulation should not be taped or glued, but must be replaced with modern insulated wire as part of your safety modifications. Just think how bad it would be if you reached in your radio to change the bulb and touched a bare lamp wire carrying 120 VAC. Ouch!! Bare wires can also short against the chassis and blow out a fuse or start to smoke. Finally, if your rectifier tube goes bad and its filament is burnt out, the No. 47 lamp will explode like a small firecracker and you must replace the rectifier tube before replacing the lamp or you'll just burn out the new one. As a general rule, if your lamp suddenly goes out but all the tubes remain glowing, you simply need to replace the lamp, but if all the tubes go cold, you should suspect a bad filament in one of your tubes and you should check them before changing the bulb. There is another way to make your radio safe (but not shockproof) and that is to use a Ground Fault Circuit Interrupter (GFCI) that is built into a power cord. Old hair dryers with a GFCI cord can sometimes be found at thrift stores and after removing the cord from the dryer, you could then use the cord as a replacement for your radio. Having a GFCI on your power cord assures you that your radio is safe even if the wall socket is wired incorrectly. Note that you can still receive a painful shock, but the shock shouldn't be dangerous. Speaking of GFCIs, you might also consider rewiring your wall socket for a ground fault interrupter. They are very cheap now and it is a good idea to install them in your house wherever there is any chance that somebody might get electrocuted. Again, you may still get a very painful (but not necessarily dangerous) shock if you touch a "hot" circuit and you could injure yourself while getting away from the shock, so I think that it is still necessary to rewire your radio for safety. Using transformers
with an unmodified radio
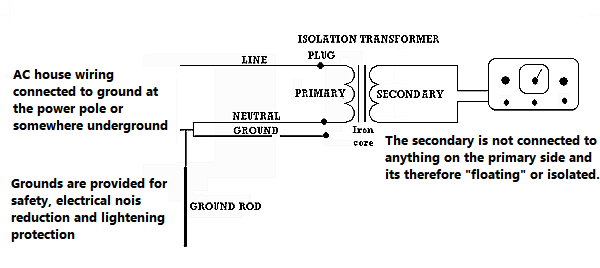 Connecting an unmodified radio to an Isolation Transformer This will render even an unmodified radio safe -- if there are no ground connections. If precautions are made to insure that nothing on the secondary side of the isolation transformer is grounded, this can be a safe way to go, but be absolutely sure of all your connections. Personally I DO NOT recommend relying on a isolation transformer and I urge you to rewire your radio for safety anyway. 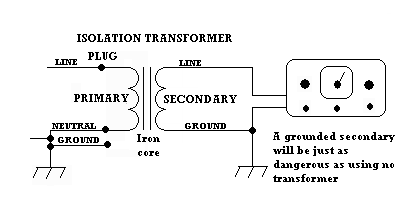 If one side of the secondary becomes grounded, your unmodified radio remains deadly dangerous.
When using a
transformer for "safety," not only must you insure that the secondary
remains isolated, but you must be absolutely sure what kind of
transformer you are using. Many people in countries with 220
VAC
(almost the entire world outside the US) use an "Auto Transformer" to
get the 120 VAC these
radios require. Using an auto transformer will give the right
voltage, but it provides absolutely no isolation and an unmodified
radio remains dangerous.
 An Auto Transformer has no secondary and does not isolate the radio.
Again, using a
transformer should not lull you into a false sense of security.
The wrong kind of transformer or a grounded secondary will
result
in an unmodified radio that is a shock hazard. There really
is no
reason to not make the simple and cheap modification that will render
your radio just as safe as using an isolation transformer.
Rewiring your power connections will make your radio
pretty
much foolproof and that is good because, after all, you may have no
control over who uses your radio once it passes on to a new owner and
they may not know about using an isolation transformer. Of
course, if you want to be ultimately safe, you could use a GFCI, an
isolation transformer AND modify the power cord and on/off switch
wiring.
The folly of using a full-wave
rectifier
Finally,
there are some people who
think that one
of these radios may be made safe by using a full-wave bridge rectifier
between the radio and the AC mains. Take my word for it, this
absolutely WILL NOT make your radio safe even if you filter the DC with
electrolytic capacitors, you will still get a dangerous pulsating DC
shock if you touch a hot chassis fed this way. Now, isn't it
true that DC is ten times safer than AC? Yes, DC is safer,
but
not pulsating DC. Pulsating DC still has the ability to cause
your heart to go into fibrillation and that is what kills you.
I
could draw out diagrams illustrating why a full-wave bridge rectifier
won't protect you, but perhaps the easiest and most convincing way to
prove my point is to have you connect the chassis to ground.
Depending on which way your AC plug is wired or if
unpolarized,
how it is plugged in, you will either immediately blow a fuse when you
connect to the wall socket or you will not be able to turn off your
radio all the way and it may start to make some very strange buzzing
noises. Consider this too, if you use a full wave bridge and
then
you filter the output with electrolytic caps, the resulting voltage
will be around 160 VDC and not the 120 AVERAGE voltage of AC.
Voltages this high will blow the filaments out of one or
more
tubes as they will glow white hot just before melting. If you
are
lucky, you will only burn out one tube before the whole string goes,
but all the other ones will be severely over heated and will most
likely be damaged and you can still get a terrible shock, so don't do
it.The only sure way to make your radio shock-proof is to rewire as I have suggested or be sure you and all others that will use your radio in the future use a transformer that truly isolates the radio from the AC mains -- and can you really be sure the transformer you want to use does that? The
limits of my responsibility and a
sincere wish:
I
have done my very best to warn you about the
hazards associated
with these radios and I have done my best to suggest safe and effective
modifications for making your radio safe.
It is entirely possible that I have omitted something very
important, so please consider all aspects of electrical safety while
using these radios. You must realize that I CAN NOT and I DO NOT
ACCEPT ANY
RESPONSIBILITY for loss of life, chronic health effects
(like
heart or brain damage resulting from electrical shock), any loss of
income or any medical
expenses you may incur due to any omissions or mistakes regarding what
I have presented
here or due to your own mistakes or due to your inability to
understand and follow the instructions. If you aren't an experienced
electrical worker who understands AC wiring, don't attempt to work on
your radio yourself, but hire
somebody who
is an expert to do the work. Don't let your grieving
survivors
bitterly
regret
you ever messed with these old radios. If you have ANY
question
regarding the safety of your radio, please drop me a line at john@geojohn.org
and I will try to
help you.I hope and trust that I have scared the bejezzus out of you and that you will take these warnings seriously. I urge you to make these modifications right away. Once these modifications are made, these radios are very safe, run very cool, may be left on all day and night unattended and may be used anywhere in the house (except maybe the bathroom) with perfect safety and you will enjoy yours very much. There isn't anything in these radios that can get hot and cause a fire, or even smoke badly, so use your radio with confidence -- but only after it has been modified. At 25 watts, they will not run up your electrical bill either. If you have any questions or concerns, please send me an E-mail and tell me what kind of radio you have and what your level of competence is. Please use your RETURN
button to
resume
the article you were reading. If you found this page from a search engine, perhaps you would like to look over my many  Radio articles, projects and essays Or
you may want to explore my website starting
at the Geojohn Home Page Before you leave, Please take a minute and sign my guestbook and tell me if this article was useful to you or not or email me directly with any suggestions |