My French Model 1777 Cavalry
Musketoon Reproduction Made in India By
John Fuhring
What, no video??? No, you are going to have to read and think., but there is detail here that will teach you more than any video can. I hope you find this essay interesting and enjoyable. This essay is presented to you free of charge and without any annoying commercials. Please
notice:
I have moved out a lot of information regarding the loading, cleaning and maintenance of the flintlock firearm to a new web page. That page can be found by following this link. There is also a link at the bottom of the page.  My
musketoon as it came out of the shipping box.
I was certainly impressed and still think it was a great bargain Foreword
Before writing another word, I want to warn you that I am
not a
qualified gunsmith and there is nothing in the following essay that you
may take as "expert advice." I hope that I have approached
everything with common sense and with good and rational observations,
but that is something you must decide for yourself. Since I
am
not a professional nor am I charging you anything, I am not responsible
for your safety, especially if you don't understand what I am trying to
say and you go ahead and do something foolish. If there is
anything that you think is foolish or dangerous for you to attempt,
don't attempt it, but write to me or seek out professional advice from
a licensed gunsmith. Always error on the side of safety since
the
person responsible for your safety and the safety of those around you
is YOU, yes you.While the original purpose of this essay was to tell about my Indian made model 1777 musketoon I bought from a Canadian company via the Internet, I have also expanded it to include what I know about flintlocks, how they work and how to maintain them including the flints, the frizzens, the loading and the cleaning. If you find that I have made any serious mistakes or something doesn't work for you, please write me at my geojohn mail address -- and not in my guestbook -- and tell me about it. The last thing I want to do is spread bad information about black powder shooting because, quite frankly, there is already way too much of it out there as it is. Before I really get going and before I get the people who make and sell these muskets mad at me, I should say that most of the work I performed on my musketoon was not absolutely necessary if all a guy wants is a reenactor's gun. Of course, there were many tasks that had to be performed such as drilling out the touch hole, but if you don't fire the piece much, rehardening the frizzen as I did might not be necessary. One word of caution though, be sure the flint is not held at an "up" angle, but very slightly points down or you will get gouging like I did. The lock is in the mortise hole pretty good as it comes from the seller, so perhaps putting it in real solidly as I did really isn't all that necessary. Refinishing the stock is certainly up to you, I just like the the way it now looks. Cutting out the cheek section of the stock isn't necessary, especially if you don't plan to live fire it with real bullets. Making the screw ends look pretty is not high on everybody's list of things to do. Bedding the barrel's tang as I did isn't necessary except maybe for those who plan to shoot full loads and a heavy lead round ball. Finally, messing around with the mainspring and the trigger pull force as I did is something many people would be horrified at and if the spring works without breaking, you might simply want to leave it alone. So why did I bother doing all these things (that I will shortly describe to you) if many of them weren't absolutely necessary? I did them because I wanted a musketoon that was well made and as close as possible to the quality of the musketoons that were made in the 1700s. I wanted a musketoon that could stand up to the rigors of battle on horseback with the reliability and strength of my ancestor's gun. I wanted a fusil that my ancestor could actually carry into battle and it wouldn't let him down. In addition to all that, I wanted my musketoon to be something as good as the best gun available and something I would be proud of without any reservations and you know what, I am reasonably sure that I have achieved it. I know that I have created a very wordy essay, but I hope it is an easy and fun read and it does have some nice pictures. Read what you want, skip around, look at the pictures. It's free, there is no password registration required and nobody is going to spy on you or charge you anything or make you watch annoying commercials, I promise. Introduction
At
less than half the price of a top quality Pedersoli musket, I
personally feel that
these Indian muskets are a bargain, although it took some metal
work and wood work (not everybody will want to do) to get my musketoon
looking good and shooting right. This essay is my assessment
of
my Indian made musketoon and is meant
to help you decide if you want a musket made in India or not.The choice of this musketoon was perfect for me for five different reasons. First, being short and very handy, it will make an excellent 14 gage shotgun that I can use for clays and for hunting. Being a horseman and ex cavalry reenactor myself, a cavalry musketoon (small musket) is way more attractive to me than a long infantry musket. 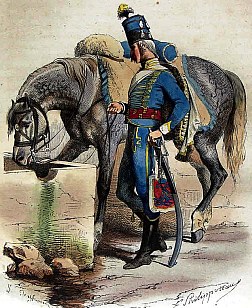 My ancestor, his uniform and his horse circa 1781 Musketoon hanging on his right side from the white sling, but not visible. More importantly, an ancestor of mine belonged to an early form of the French Foreign Legion (the Duc de Lazun's Legion) and being a cavalry hussar, he and his unit was issued this very model of gun when they fought on the American side at the Siege of Yorktown. Actually my ancestor's unit was at Gloucester Point on the other side of the river where they fought and defeated the British Dragoons (cavalry) commanded by the much hated Col. Tarlton who had been sent there to hold Gloucester Point for the British during the Siege of Yorktown. In the fight, Col. Tarleton's horse was killed and he was very nearly captured by my ancestor and his comrades, only to surrender himself to the French forces after Yorktown fell. It was a good thing he was able to surrender to the French because the Americans probably would have shot him. My ancestor was one of 11 hussars (French cavalrymen) wounded in that fight, a fight that effectively neutralized the British Dragoons. Well, so much for family history. Finally, because the musketoon was so inexpensive, I felt free to tinker away and improve things so that I might end up with a gun exactly the way I wanted it, and you know, I have. For the price, for hunting, for the fun of owning and shooting an 18th Century flintlock, for a chance to practice a little gunsmithing and for historical reasons related to my ancestor, this was the exact model flintlock fusil I wanted to own and shoot. By the way, this fusil is covered by a (chuckle) "warranty" that is immediately voided if you drill out the vent or do anything to the wood or metal work. Of course it will look good as a wall hanger and will amaze people by sparking, but if you want this period musketoon to look and work as well as an original, simply forget the so-called warranty, get the tools out and have at it. In passing I want to note that it is entirely correct to call this firearm a 'gun,' a carbine, a musketoon or if you want to get fancy, a fusil (pronounced fuse-ee). It is NOT correct to call any rifled firearm a 'gun,' but by the same token, it is highly incorrect to call any smoothbore musket or musketoon a 'rifle' because only firearms with rifling are rifles. Because my musketoon is a gun and not a rifle, it is not nearly as accurate as a rifle at distances more than 25 to 50 yards. Anything beyond 50 yards and it is very unlikely that you'd be able to hit even a man sized target, much less within the "kill zone" of a deer. If any smoothbore would be used for hunting, it is my firm opinion that any shot 50 yards or more is unethical and should not be attempted. These weapons were designed to be pointed in the general direction of the enemy with the hope that volley firing would decimate the enemy (which it seldom did). How these muskets were made then
and now
Back in the 18th and 19th
Centuries the original barrel tubes were made from a long "ribbon"
of wrought iron that was wound around an iron mandrel and while the
strip was
still red hot, it was hammered to weld the strip into a tube.
There are several videos showing how this amazing process can be done
by a skilled blacksmith. By
today's standards, this was a crude way of making a barrel and
therefore all barrels had to be proof tested to see if the welds would
hold. The barrel tubes that made it past the proof stage then
went on to work safely and reliably to this very day.
Actually,
these barrels were made by expert smiths who turned out hundreds of
barrels a day in huge workshops.By contrast, the barrel of my Indian reproduction is a seamless steel tube made of modern homogeneous, medium carbon steel. Being made this way and out of modern steel, the barrel would be several times stronger than the original gun's hammer-welded, wrought iron barrel. The seamless steel barrel of my musket is not proof tested nor does it need to be since I will only shoot black powder in it. Steel anywhere near this good wasn't available to firearm manufactures until the 1850s when Colt introduced a high quality homogeneous steel they called "Silver Spring Steel" that was made from low phosphorus Swedish iron ore. As good as Silver Spring Steel is, I seriously doubt the old Colt steel is anywhere near as good as this steel. By the way, my reproduction's barrel wall is noticeably thicker than an original Brown Bess' barrel at their muzzles. The Brown Bess' wrought iron barrel is about 0.065, whereas the Indian Musketoons muzzle thickness is around 0.075. A high strength modern steel barrel that is thicker than an original musket's wrought iron barrel means than any talk of these Indian made muskets having weak barrels is simply prejudiced willful ignorance. During the period these muskets were made, the bore could vary quite a bit from .71 caliber down to .65 caliber and still pass the military inspectors at the factories. Exact diameters were not all that important when shooting undersized round balls and in fouled muskets anyway. Of course, the French muskets had a reputation for having more carefully machined bores and were considered more accurate than the English Brown Bess, but that varied from gun to gun and in volley firing, it wasn't all that important. The barrel of my musketoon has been bored perfectly round to a tiny bit over 0.69 inches so that a .69 round ball easily slides down it and it is the same diameter all the way down the barrel expanding just slightly near the powder charge area so that fouling won't cause it to jam. Back in those days, steel making was a kind of a "black art" or perhaps a "blacksmith's art" and so every iron part of a gun was made out of wrought iron or started out as wrought iron. Wrought iron is an almost pure form of iron without any carbon in it to give it strength or hardness. Wrought iron can not be hardened by quenching in water, in fact, if you heat wrought iron and plunge it into water, it only gets softer because what little carbon it had is oxidized out of it. Wrought iron has slag and other impurities from smelting that tend to form layers within the iron and therefore wrought iron is not a homogeneous iron and is considerably weaker than even mild steel. Wrought iron is very easy to hammer into shape (thus the word 'wrought') and once formed, it is very tough, soft but tough. The surface of this kind of iron can be turned to steel by the process of "case hardening" or carburizing where carbon is added to the surface of the metal when it is red hot and then that surface is made super hard by quenching the red hot piece in water. The process of carburizing the surface of iron makes parts that are tough and hard, don't wear out and will spark when struck by flint. The case hardening process was well understood by the smiths of the 18th Century with their big forges, but today we can do the same thing with simple gas torches and inexpensive hardening compounds. Overall impression of my
musketoon as it came from the seller
My first impression was one of amazement at just
how good
looking this piece is. Of course, I had to put in a musket
flint
I had waiting and I was very pleased at the large shower of sparks and
the hardness of the frizzen as indicated by the Arkansas flint not
"digging in" and shattering -- at least at first and for a little
while as the frizzen was "breaking in."I was (and am) extremely pleased that the barrel and lock isn't covered with modern stampings and proof marks. I have had to "defarb" two Traditions Spanish flintlock pistols of mine and it is very time consuming work (but very satisfying when done). The marks that are stamped on the barrel of this musketoon, including its country of manufacture, are completely out of sight on the underside near the tang. I have nothing but praise for the metal work of this reproduction and the slight modifications I made to improve the looks of little things here and there were easily accomplished with a little time and some simple tools, however, the "slight modifications" I performed are not for everybody. By the way, this musketoon comes beautifully polished in the very best traditions of "armory bright" that all soldiers were to keep their muskets looking all the way up through the American Civil War. When ordinary steel is polished up this way, its surface is somewhat "passivated" and it doesn't rust if it is kept dry and waxed or oiled. It looks beautiful and shiny guns and bayonets were the sign of a well drilled and disciplined military group and the flash of polished muskets carried by men going into battle formation is an awesome sight to see. Certain YouTube videos of reenactors will show guns that are rusty or have a browned barrel. This is absolutely incorrect and I'm very glad my Indian musketoon came looking as it should and, what is more, I plan to keep it "regimental armory bright" for as long as I have it. With regard to the woodwork, that also looked beautifully done, at first glance. I have no idea what kind of wood my musketoon is made out of, but the musketoon, at 6 pounds 10 ounces, is almost a full pound lighter than the ones made out of European walnut. If you can believe it, completely stripped of all metal parts, my stock weighs only 17 ounces, it is that light. My guess is that the wood is Basswood or something similar although it seems much harder than Basswood. To tell the truth, I love how light the gun is, but I was concerned that the wood might be too fragile and not hold up to live firing. That concern proved to be unfounded because the wood of the stock held up fine to live firing and what is more, now that the barrel is "bedded" in an epoxy wood filler (as will be described), the stock should hold up well indeed. The wood, as mentioned, is light in weight, but it is hard, doesn't dent easily and has a nice grain pattern to it. The outside of the stock is well carved and shaped, but it lacked the hollow in the butt for the shooter's cheek that the model 1777 muskets have. The gun came with a kind of yellow-brown finish that covered the light colored wood below, but I have since refinished it so it has a nice walnut color and I've hollowed out the stock for my cheek as I've seen in original pictures of this model. As mentioned, I am extremely pleased with the wood this stock is made from and only wish I knew exactly what kind of hardwood they used since it is such an ideal wood. Somewhere I read that the muskets stocks from India use teakwood. I'm not familiar with teak, but the descriptions of teak don't sound like my stock's wood, but I could be wrong. The mortise and the barrel channel were obviously carved out by hand and not by precision machinery (as an Italian gun would be). With the lock and barrel removed, the woodwork under there looks a bit crude. At first this didn't seem to be a problem, but I soon discovered that I'd have to use an epoxy wood filler to make the lock fit in correctly, but none of that shows, so it doesn't bother me in the slightest. For all I know, hand carving is how the original mortise and barrel channel were formed since it is unlikely they had precision machinery back then and perhaps an original musket's hidden woodwork is likely to be somewhat crude too although I doubt they had epoxy wood filler back then. The frizzen came hardened and it produced an amazing shower of sparks, but a problem with the depth of the hardening became apparent and I had to reharden the frizzen, but more about that later. With regard to trigger pull force, it required many pounds of pull. I didn't measured the exact pull, but I guessed it was over 10 pounds and was probably more like 12 pounds. You really had to have your finger on the trigger when you went to squeeze off a shot because of all the force necessary and there were times I had to stop squeezing and reposition my finger. You could easily suspend the fusil at full cock by the trigger. At first I thought I'd not mess with the sear or the mainspring and I'd just leave the trigger pull really heavy, but the more I shot this fusil, the more unhappy I became and the more I realized that the heavy trigger pull was interfering with my aiming and holding the piece on target. I'll say more about this later. Improving the operation and looks
of my musketoon
Of course, this musketoon comes without the vent
hole
drilled. I used an ordinary 1/16 inch drill to
create the
vent, but expect your drill to break because when you go through the
wall of the barrel, it will encounter an angled breech plug which will
snap off the end. 1/16 drills are cheap. After I
had
created the vent, I tried it out and I was surprised at how quickly the
small test charge in the barrel was set off. I had expected
an
ignition delay because I didn't have a vent insert, but ignition is
almost instantaneous. 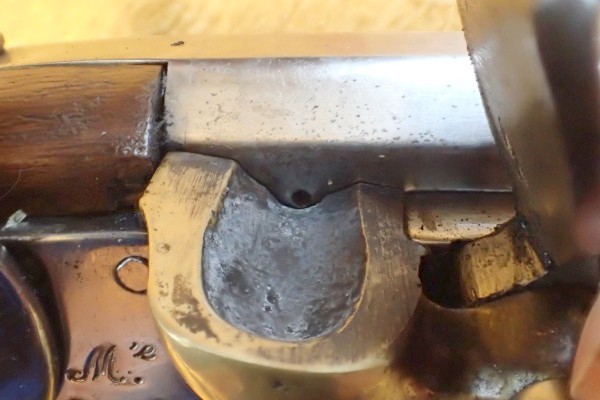 The primer pan, trough and vent hole Dirty after firing the piece The bottom of the pan actually lines up with the barrel more than half way up and since I might want to add a vent insert some day, I wanted to drill the vent in the center of the barrel. I took a black marking pen and made a mark on the barrel at the lowest part of the primer pan and then took the lock off. The mark was near the center, but a bit above it so I took a punch and made a mark just below my mark and in the center of the barrel. I then drilled the vent hole with a common 1/16" drill. This size drill is available as titanium nitride tipped packs of 7 for just a few cents at Harbor Freight, but because of the angled breech plug, you will break one as you go through the barrel's steel. As mentioned, they are common and cheap, so don't worry about breaking it. By the way, 1/16" is ideal for a touch hole because it is too small to leak FFG grains, but lets hot gases from the pan enter and set off the main charge. If you have to (and I have already had occasion to do so), you may load in 10 grains or so of FFFG powder into the firing chamber using a thin probe of some kind to push the powder in from the primer pan. Very useful if you have a bullet or paintball in there without powder behind it.  Cross section looking from the top. This is my guess regarding how the breech plug is fitted to the barrel When I put the lock back on, the primer pan half covered the vent hole so I took a round file and made a little angled trough so the vent would be fully exposed. I liked the trough idea rather than try to carve out the entire primer pan since the trough would concentrate powder there without an excessive amount of powder in the pan and I could expect fast and reliable ignition of the main charge -- which is actually the case. I should add a note of caution here regarding this idea of carving out a little trough. If the touch hole isn't lined up with the top of the primer powder in the pan, conventional wisdom says that you will get a slower ignition. Most flintlock gunsmiths absolutely insist on having a touch hole up high up like this, but I've found that with modern black powder, the burn rate is so fast that the trough has no effect on the time from pulling the trigger to when the gun goes off. My musketoon has no more delay (that I can tell) than my other flintlocks and what really convinces me is the trough in the pan of an original Brown Bess musket I recently restored. This old gun has a trough exactly like mine that someone long ago cut into its iron pan, only deeper and longer. By the way, based on the Brown Bess' trough, I have slightly deepened and lengthened my trough too. To improve the looks of the screw ends (which look like they were simply hacksawed off), I put them in the chuck of an electric drill and with a file I shortened them and rounded their ends. Very easily done and what an amazing improvement in the looks of the lock and other places where the screw ends are showing. The screws even line up easier and are more easily put in. 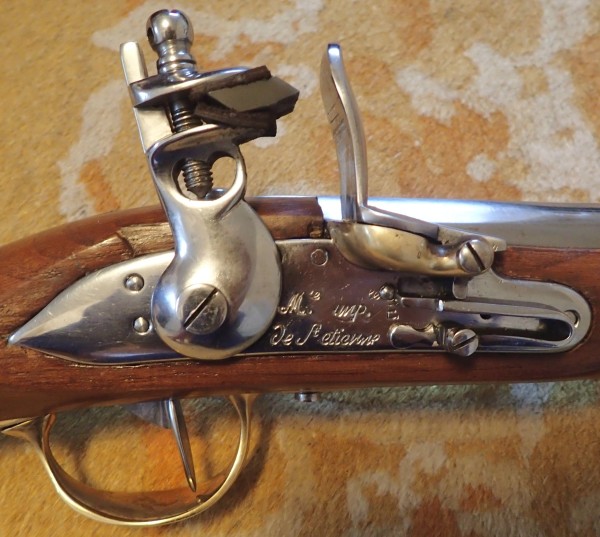 The beautifully finished lock with the improved screw ends showing. Notice the lock is correctly fitted and is at the right depth in the mortise hole. The flint must be oriented and positioned so that it does not strike the frizzen straight on but sort of "glides" down the frizzen's face, but not so shallow no sparks are created. You better have a steel rod ready for frequent adjustments until you get the flint just right. The next thing that had to be worked on was the fact the front sight was cocked off to one side. With the front sight looking that way, it just had to go. Being made of brass, the front sight was easily filed away and then made smooth and polished. To replace the front sight, I took a thick brass rod and made a similar front sight, curved the bottom and then soldered it about where it should be. I like the way it looks although it is not quite authentic and it is better than no sight at all. My biggest gripe, but one that was easily fixed, was how poorly certain aspects of the mortise was carved. The lock looked like it fit perfectly in the mortise hole, but early on I noticed that the rear of the lock would sink deeply into the stock if the rear lock screw was tightened first, but if the front screw was tightened down first, the rear of the lock would stick out. Obviously the front and rear of the mortise hole, areas that support the lock, were cut too deep and very unevenly so that the lock was not square in its hole or at the right depth. I rolled up a small amount of JB Quick Wood and then applied it to the areas that needed building up. I smeared on my shooting grease (Crisco + beeswax) to the underside of the lock so that the wood filler wouldn't stick to the lock and then positioned the lock at the correct depth. With the left over filler as a guide so I knew when I could remove the lock, I waited until the filler had hardened, but was not too hard. While the filler was still workable I removed the lock and then easily carved out the excess filler so that holes and other structures were clear of filler. After an hour or so the filler had set up rock hard and when I put in the lock, the fit with both the front and rear were at the ideal depth and there was no rocking. To say the least, I am extremely pleased with the way this simple, quick and easy modification turned out. Being covered by the lock, the filler material is completely invisible. 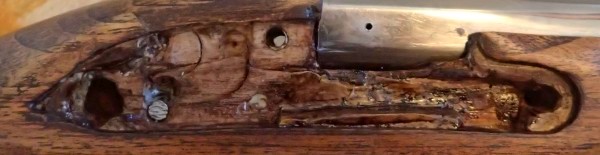 A closeup of the mortise hole. Quick Wood takes a stain nicely and it is difficult to tell what is original wood and what is filler. Yes, the carving inside is crude, but it does not show and all mortise holes are crude looking. Look at the picture above to see what the mortise looks like covered by the lock. While checking the muzzle I noticed that it had been machined with very sharp edges and so, as I do with my revolver chambers, I removed the inside sharp edge, but because the hole is so big, I had to use a large reamer and then finish the job with some fine sand paper. For the outside edge, I carefully ran a fine file around the outside until it was rounded and no longer sharp. I will say more about the need to have a deeply hardened frizzen face in another article, but right now I'll simply say that my frizzen was plenty hard enough to throw good sparks and for a while I was pleased to leave it alone, but the hardened layer proved to be very shallow and the flint began to dig in after a while and then the flint started to shatter. 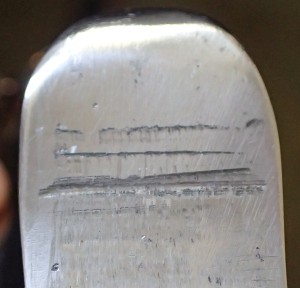 Marks where the flint struck the frizzen surface. The hardened layer was too shallow and allowed the flint to dig in. In hindsight it appears that this was caused by the flint held in the cock at the wrong angle because of a defective top jaw. I smoothed off the surface with a diamond wheel until it was pretty smooth (but still showing the flint dig marks) and then proceeded to deeply harden the frizzen by subjecting it to three Kasinite heat treatments using my mapp torch. (Kasinite is no longer available, but Cherry Red should work equally well) After those relatively easy treatments, I tested the frizzen and it is harder than a steel file. When dry firing the lock with a flint in the cock, the frizzen gives me good sparks, the flint doesn't digging in and the flint shattering has stopped. I expect that my ignitions will be much more reliable and my flints should last a long time. As mentioned earlier, the trigger pull was extensive and so I disassembled the lock mechanism. The key to disassembly is to take the tension off the mainspring. This was tricky because if the spring is compressed too much in the wrong part of its travel, it will break and then you've got some real problems trying to find a replacement. I made a special tool for compressing the mainspring, but found that the mainspring had some manufacturing problems of its own which I will --- yes, say more about later. 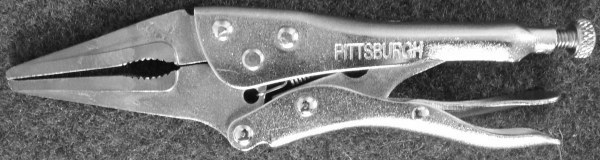 The "dreaded
locking pliers."
After carefully removing the mainspring and taking the tumbler out, I very carefully filed the full cock sear angle a little flatter than it was, reassembled everything again, tried out the trigger pull, wasn't happy and repeated the process. On my second attempt, the trigger pull was lighter, but still quite safe and I'm happy with it because the lighter trigger pull has made holding my gun on target much easier.  The channel on the left was way too narrow and would close long before the spring was compressed. This made for a spring that was too strong and the compression was limited to just a small area. Fortunately the spring's steel is not brittle and it didn't break before I could open up the channel.
While I had everything apart I noticed that the
mainspring
was not made correctly and it would bind up before it the lock was at
full cock putting a lot of tension on just a small part of the spring
and making the cock really hard to pull back. Comparing the
cocking force necessary to pull back a Brown Bess (I was working on),
my musketoon was really heavy due to the way my mainspring was binding
up. I took a tiny diamond saw and opened up the rear of the
mainspring where the parts of the mainspring were touching. I
further opened up this area with a hacksaw blade until I could get it
almost to the bend. While I was at it, I removed a small
amount
of steel from the top of the mainspring while maintaining its taper
toward the front. After accomplishing this task, I notice
that
the spring compresses (moves) along its entire length just as it should
and cocking feels more normal.
I am really quite pleased with this modification because the cocking force isn't quite as much as it was. Not only will this make it easier to operate the gun, but the flint isn't slammed as hard against the frizzen and I have already noticed that the flint is lasting longer. As an added bonus, the frizzen seems to spark better than ever and perhaps that is due to the frizzen not being forced open quite as quickly and this allows the flint to scrape across more of the frizzen's surface. I don't know, but I like how everything works. Regarding other matters, I noticed that the ramrod was cocked slightly off to the right when the underside was facing me. At first this was no big deal, but the more I looked at it, the more annoyed I became. I removed the front brass barrel band and examined the channel which the ramrod goes through and discovered that it had too much metal on one side. I took a fine round file and carefully removed the excess metal a little at a time while testing the ramrod's position and finally I had the ramrod positioned correctly under the barrel. The stock of my Indian musketoon did not come this way, so I carved out the butt for my cheek as is shown below. This was done in the original model 1777 muskets and what a huge improvement it has made in aiming my musketoon. I can now get my eye down low enough to look down the barrel and line up the rear screw with the front sight. While I was at it, I stripped off the brown-yellow factory stain (I didn't like anyway) and have stained it a rich dark walnut by using, of all things, brown and black shoe polish, yes, shoe polish. To say the very least, I absolutely love the way my musketoon now looks and I especially love the way I can now get my eye down close to the line of the barrel for more accurate sighting. I want to say more about using shoe polish to stain and protect my musketoon's wood. I know it sounds crazy, but this is one of the best ideas I've ever had and one of the most successful experiments I've ever tried. The polish gets into the wood, turns the surface into a very natural looking color and gives it a tough, dry and smooth surface that is waterproof and easily fixed if the wood gets scratched. All the other varnishing techniques I've used up to now has left a fragile and easily damaged surface, but as far as I'm concerned, the shoe wax is a superior finish for my gun. Of course, shoe wax does not fill up the tiny channels in the wood and you do not get a glass smooth surface like you can have with a thick varnish, but those surface irregularities have an added bonus in that they act like checkering so that the stock feels solid in my hand. I have a theory about why the stocks of the model 1777 muskets and musketoons were hollowed out and here it is: The designers of the famous 1777 (AN IX) model were clever and wanted a fusil that would have a straight stock for three reasons. First, a straight stock sends the recoil energy straight back to the shooter's shoulder so that the gun does not have a tendency to climb and hit the shooter in the face. Second, with a straighter stock, without all that "drop," saves a lot of precious walnut wood because cutting out a straight stock doesn't require such a large "blank" of walnut. Third, a straight stock is quicker to handle and with the cheek indented, the fusil is automatically lines up with the front sight and the rear tang screw and all you have to do is select your target. Later guns and rifles have sights that aren't so close to the barrel and so the stock's cutout isn't necessary, but for this gun, it really is a great idea. Without doubt the most important reason that the French gun designers went to a more straight stock came from a well known expert, Peter Plunkett, who kindly informed me that if the wood grain lines up with the butt plate, it made for a much stronger gun that wouldn't split at the hand grip as did the older muskets and all models of the Brown Bess. The stock around the hand grip is so much stronger in the French 1777 musketoon, the circumference down there is only a bit over 4 inches whereas an original Brown Bess I'm working on is a tiny bit over 5 inches -- almost exactly one inch more to prevent breakage. Guys back in those days were smaller than today and I think we can assume both French and Englishmen had similar sized hands (and other members too, ha, ha) so the smaller grip of the 1777 must have made it easier to handle. By the way, in terms of live firing, this cutout is perhaps the best thing I did to improve the operation (or "shootability") of my musketoon. 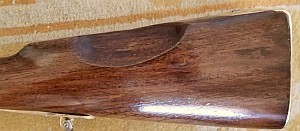 The cutout I made in the stock for the shooter's cheek. I don't know if the original musketoons were carved out like the muskets were, but I would have made this cutout anyway because it has so vastly improved sighting down the barrel. While I had my musketoon apart, I noticed that the rear of the barrel was not well "bedded" into the stock and that heavy recoil might eventually split the stock at the rear of the barrel and tang. To correct this I decided to "bed" the rear of the barrel with an epoxy wood filler. To keep the filler from sticking to the metal parts, I coated the screw that goes back there and the rear of the barrel with shooting grease and then filled up the area with J B Quick Wood. I put the barrel in the stock, the muzzle on the ground and then applied pressure to the butt (I leaned on it) to force the barrel to form-fit into the stock. As I did before, I waited for the epoxy to partially set up before removing the barrel and while it was still workable, I carved out the excess wood filler. My "bedded" stock is now much stronger and I have no worries that the stock could possibly split. Cleaning my musketoon for the
first time
As my Indian
musketoon came out of the
shipping box it was covered inside and outside with a protective
petroleum grease that I removed with brake cleaner spray. I
took
everything out of the stock so the brake cleaner's powerful solvent
wouldn't ruin the original factory finish of the wood and then sprayed
everything down. The solvent that accumulated inside the
barrel I
simply poured out, but only after scrubbing the inside with a
cleaning patch. I cleaned the inside of the barrel a couple
of
times with solvent and a patch to make sure I got all the petroleum
grease out. After spraying down all the parts in brake
cleaner, I
wiped everything down with a dry cloth and the insides of the barrel
with dry patches and then gave everything, inside and outside a
protective layer of shooting grease.
Safety concerns regarding my
Indian made musketoon
To be honest, I would hesitate and I absolutely do
not
recommend shooting full military loads in an actual 18th Century musket
with a wrought iron barrel because without extensive X-ray inspection,
it is impossible to know if the breech can stand even black powder
pressures. It is entirely possible that your antique was
cleaned
with
water and over the years the salts and acids formed by water reacting
with the fouling salts ate away
at the breech and made it too thin to be able to resist chamber
pressures. My Indian musketoon has a strong breech made of
modern
steel with a threaded breech plug and has never had a drop of water
down it. The only way you could possible have a mishap with a
musket
built like this is if you load too much powder
and get a too large bullet stuck halfway down a fouled barrel.
Any Indian, Italian and especially an original musket can be
expected to crack or at least bulge its barrel under these
circumstances.I was just thinking about something I noticed when I did cavalry reenacting many years ago. We would put in full loads of powder so that we'd get a lot of smoke and a big bang, but that would build up very thick layers of hard fouling not seen in live firing and the build up would be surprisingly fast. Of course, it was part of "camp life" to clean the weapons in the field after a reenacted battle using hot water from the company coffee pot to flush out the thick layers of fouling. I would certainly never advise anybody to use hot water as a cleaning agent, but back then we did it as a quick way to keep our weapons clear and worried about doing a proper job of cleaning and oiling only after we got home from the big event. Because firing blanks really builds up fouling thick and fast, a barrel obstructed this way might become dangerous especially if the reenactor neglected his weapon and let the fouling build up over a couple battles or more without cleaning. An obstructed barrel will bulge or blow up regardless of what it is made of or where it is made. The very best Italian steel will blow as quickly as Indian steel so you reenactors who shoot blanks, please do not neglect your weapons and remove all fouling after a battle even if you have to pour hot water down your musket. As I wrote earlier, the barrel of my Indian reproduction is made of modern homogeneous, medium carbon steel and it is reasonable to assume that it is several times stronger than the original gun's hammer-welded, wrought iron barrel. As strong as I believe this barrel to be, I will not violate any of the safety precautions regarding powder type, loads and bullet placement in the bore of this gun. From what I've read, 130 grains of period, slow burning, low energy, FFG powder was the military load, but 70 grains of modern, fast burning, higher energy FFG gives a big bang and a nice big kick, so that's my official maximum load. I will insure that the grease and bullet rests lightly on the top of the powder for safety too. Unlike smokeless powder, there must be no "head space" between the powder and the bullet or an explosive detonation can occur that will bulge or fracture even the best steel. Speaking of smokeless powder, trying to use anything but real black powder in a flintlock gun or rifle is as foolish as it is possibly to get, so don't even try it. Even black powder substitutes work terrible in a flintlock because of their higher ignition points, so again, use real black powder or you may be stuck with a loaded gun that you can't discharge --- if you are lucky. Conclusions and suggestions
It is my opinion that for less than half the price
of an
Italian reproduction, together with some rather fun tinkering (that I
really enjoyed doing), I have a musketoon that I am very pleased with,
thrilled to shoot
and proud to show family and friends. I am especially proud
to
have this piece because one of my ancestors was a man from Lorraine who
spoke Franconian German and was a hussar in the
French cavalry. He served in America under French
commanders during our Revolution and was, without doubt, issued
this very same model of cavalry musketoon. Showing off my
musketoon
gives me an excuse to tell people what I know about my ancestor and how
he and his rowdy, bad-boy buddies deserted from the French Army before
the ship sailed back to France after the Battle of Yorktown and what
happened to him in the wilds of Pennsylvania afterwards that is both
family legend and verifiable fact.I should mention that the lock plate has the French Imperial "imp" stamped on it rather than the "roy" my ancestor's 1777 model would have had. Since this model was so successful, the French arms manufacturers kept making it all through the time of the French Revolution and long afterwards until 1822. Pete Plunkett pointed out to me that these reproductions were made mainly for Napoleonic reenactors and not for descendants of cavalrymen of the Duc de Lazun's Legion, so hence the Imperial mark. Yes, I wish my fusil had the earlier markings, but if I don't tell anybody, they won't know about this and I'm only telling you because I can trust you to keep it quiet. Are these Indian muskets for every flintlock lover? The short answer is no, they certainly are not. There are a series of questions you must ask yourself before considering getting one of these cheaper guns rather than a top quality Italian musket. First, is the gun simply for display and if it is, these muskets are perfect because they look good and function well and few people are going to look closely to see that the screw ends are hacksawed off. If the owner wants a good looking, good shooting piece, but he has poor mechanical/technical skills, doesn't work well with small tools, does not have a workbench with the proper tools and equipment and is a certified klutz, it is best to spend the extra money and buy an expertly done Italian musket. The Italian made muskets will have the vent hole drilled correctly and it will come in a firing condition. An Italian musket will have all the parts finished properly and the lock will fit perfectly in the wooden stock. If the owner likes to take on a whole series of simple jobs whereby he will finish screw ends, add a little wood filler here and there, do some simple wood carving with a rotary tool, case-harden a frizzen with a big gas torch and has the skill to drill a tiny hole in the barrel that lines up with the bottom of the priming pan, this could be the ideal project. For guys like me, it is like buying a kit that is already 95% complete with just a few things needing a final fit and some minor metal finishing. For guys like me, this "kit gun" allows him to custom (re)make a fusil to his own satisfaction and end up with a gun exactly as he wants it without being afraid of messing up an expensive gun he otherwise wouldn't want to mess with. In all honesty, I now have a cavalry fusil just like my ancestor's that I am completely happy with, completely proud to own and there is no way I would trade it for the most expensive and best made Italian model.   My musketoon as it
is now.
Finally there is this, I find it more than a bit
ironic
that, in the 18th and early 19th Centuries, trading posts would sell
flintlock guns (very similar to my 1777 model) TO the Indians, but now,
200 years and more later, here we are buying flintlock guns FROM the
Indians. Who would have guessed it? Ha, ha.I love the way it looks and how everything operates. Latest changes
After months and months of happy ownership, I've
just lately made three more "improvements" to my musketoon. The
first improvement really was necessary to improve the functioning of
the flint and steel that ignites the powder. The other two
"improvements" are cosmetic, but as unnecessary as they were,
making those changes has increased my joy in owning this musketoon. It took me a long time to realize this, but now that I have and I have corrected it, my frizzen throws an amazing amount of sparks when the flint strikes it. What am I talking about, you may well ask. I'm talking about the angle of the flint in the cock and if the screw is square with the top jaw. I just wouldn't have believed how important that was, but let me tell you about it.  Here is my musketoon's cock holding the flint at the wrong angle. Notice that the top jaw is on the guide's bottom. You can't see it, but the screw is not square with the top jaw and the top jaw is rotated up rotating the flint up too. This is made worse if you use a thick flint or thick flint holders like the lead ones shown below. Weak sparks even with a very sharp flint.  Although it is hard to see in this photo, the flint is now
held at the
proper angle. Notice that the top jaw is square with the screw and the top jaw's rear is above the bottom of the jaw guide (on the left) where it should be. The flint now throws a strong shower of sparks and does not tend to shatter or gouge the frizzen. I needed a much tighter fit between the top jaw's hole and the shaft of the screw if I wanted the top jaw and flint held in correctly. I considered brazing metal into the hole and then boring it out to the same diameter as the top of the screw shaft, I considered brazing metal on to the screw shaft and machining it to the same diameter as the hole, but, in the end, I used my little lathe and made a brass insert that fits tightly inside the jaw hole and has a bore diameter the same diameter as the screw's shaft. As you can see, the insert works perfectly. After I had the flint in the jaws at the proper angle, I was pleased simply with its appearance and felt it was worth the effort if only to make my musketoon look more like an original, but that wasn't the end of the story. When I went to try the lock, I was very pleased at the large shower of sparks that the frizzen now throws. Who would have thought that flint angle and top jaw position was so important? I never did, but I do now. Now for the cosmetic changes. I never liked the frizzen that came with the gun. I just didn't like its shape and the fact that it was the AN IX type and not the original 1777 design. I also didn't like the fact that the Indian gunsmith didn't line it up very well and it is cocked off to one side when it is in the lock. Certainly, the frizzen that came with my gun works well (after all my work), but I just didn't like its shape or the fact it looks very different from the frizzen of my ancestor's gun. I found a place that sells replacement parts for the original 1777 models and so I sent off for a blank frizzen. Fitting the new frizzen in there and getting it to work properly took hours and hours of drilling, grinding, filing, hand fitting, hardening, fine tuning and polishing, but now that it is in there, I absolutely love it. I love the way this older frizzen design looks due to its more graceful shape, I love the look of a better alignment and I love the way the gun is even closer in form and function to my ancestor's fusil. An additional bonus is the pan cover now opens really wide to fully expose the pan for priming and cleaning. For me, installing this older model frizzen was well worth the cost and the effort, but I admit that very few people would agree with me. My second "improvement" was really quite unnecessary, but the original 1777 model musketoons were not made for a bayonet and my gun having a bayonet lug bothered me. The fact is, the cavalryman's weapons were the saber, the pistol and the carbine (musketoon) and a bayonet on a short gun is a waste of time. The short musketoon's bayonet would be at a great disadvantage over a longer battle musket's bayonet, so it would be foolish for a cavalryman to engage with the enemy with a bayonet. Besides all that, a cavalryman has much better things to do than to engage in bayonet charges on foot or try to use one on horseback. I mean, it would be just stupid for a cavalryman to try to use a bayonet in battle when his saber, carbine, pistol and horse makes him so much more effective. By the time the enemy's infantry, with their bayonets at the ends of their long battle muskets, were overrunning a defensive line, the cavalryman and his horse had better be long gone to go fight somewhere else where they were more needed. For some strange reason that I don't fully understand, the later AN IX versions of this model fusil had a bayonet lug on the underside (the usual place for a French musket). Of course, the AN IX musketoon was very popular with the gendarmery (police) and perhaps the bayonet at the end of a musketoon would have been handy for crowd control. When I decided to give my musketoon a more original look by replacing the frizzen, I "bit the bullet" and carefully removed the bayonet lug and then carefully rounded that end of the barrel and repolished it. So, am I now glad I got rid of the bayonet lug? Oh, yeah, I am. Do I miss not having a bayonet lug? Not one little bit. Here are a couple of late changes I made to "correct" some things that were bugging me. First, this is a cavalry musketoon and the cavalry never carried their carbines over their shoulders, but suspended them from wide slings around their necks with the muzzle resting in a socket (or "thimble") on the saddle. The cavalry carbines did not have sling swivels, but relied on the bar and rings on the left side of the carbine for carrying the carbine. Carried this way, the swivels were totally superfluous and I believe that the earliest issue of this musketoon did not have them. My musketoon having them always bugged me, but I was always reluctant to do anything about it. By the same token, the end of the ramrod at the same level with the muzzle of the barrel is wrong. To keep the carbine from flopping all over the place, the muzzle was placed in a socket (called a thimble) on the saddle as mentioned . Of course, most muskets made for infantry had their ramrods extend to the muzzle for ease of withdrawing it for reloading and so most people naturally expect the ramrod to be there in all period firearms, but the cavalry carbine was a specialized weapon and there had to be space for the muzzle to fit into the saddle thimble. As mentioned, these "farbs" bugged me until finally I just couldn't take it anymore. With some reluctance, I took a hacksaw to the sling swivels and cut them off. I then filed the steel and the brass that remained flush with the other parts and then polished the part to a mirror brightness to match the rest. When I was done, I hung the musketoon up above my fireplace and I must admit that it looked very strange. At first I was somewhat regretful I had done this to my musketoon. Now, after weeks have gone by, the musketoon looks sleek and I have come to really like the fact it no longer has those swivels and, by no means, want them back. Then there was the question of the ramrod. By simply removing the brass bottom plate, I exposed the end of the ramrod channel in the wood of the stock. I sawed off the brass blocking piece on the underside of the bottom place and then it was a simple matter of grinding out the wood in the channel all the way down to the tang bolt so the ramrod end now rests on the tang bolt. Of course, I don't know for sure if this was the way the original 1777 models were built, but I have carried cavalry carbines (Civil War era) with the muzzle in a thimble and I know that the muzzle can't have a ramrod sticking out too far or it won't fit in the thimble and if you have a ramrod sticking through a thimble, it can fall out and be lost. Also, in pictures of period carbines, the ramrod does not stick out to the end of the muzzle. There is very little doubt in my mind that the original musketoon my ancestor carried had a recessed ramrod, but perhaps the later AN IX models (meant for the gendarmes) and needing a brass tab reinforcement tab because of the bayonet they were made for, did have a ramrod that stuck out all the way to the muzzle. 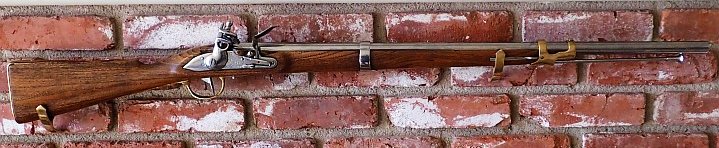 My 1777 musketoon over my fireplace. Notice the lack of sling swivels and the recessed ramrod. The front swivel used to get in the way of holding the piece, but now the carbine handles much better and quicker without it. Every time I do something to this piece, I like it more. Of course, my goal was always to have a firearm as close to my ancestor's as possible and so I get a feeling of satisfaction every time I look at my musketoon hanging over my fireplace, showing it to others or at the range doing some shooting. See what I mean, because this Indian made musketoon was so inexpensive, I was and am free to modify it to be just exactly what I want it to be. Now if I could just replace the "imp" with "roy" on the lockplate, my joy would be complete. THE END
(for now)
If you have any detailed comments, questions, complaints or
suggestions, I would be grateful if you would please
E-mail me directly I have a new page made exclusively for those who would like to read my thoughts on the operation, loading, cleaning and maintenance of flintlock firearms of all sorts.  Shooting the flintlock firearm  You might be interested in how I recently rebuilt my friend Paul's flintlock Restoring Paul's original India Pattern Brown Bess  The Defarbation of the Trapper Flintlock Pistol or how I made my pistol look and perform like one of the 18th Century's best  How I took two caplock pistols and made them into identical 18th Century flintlock dueling pistols If you like more "modern" Civil War revolvers, you might like to read one more of my  Black powder revolver articles. or you can go to my shooting articles selection page There are lots of other things here you might be interested in and no commercials Please go to my Home Page for more exciting adventures. |