The Defarbation of my Trapper
Flintlock Pistol What, no video??? No, you are going to have to read and think., but there is detail here that will teach you more than any video can. I hope you find this essay interesting and enjoyable. This essay is presented to you free of charge and without any annoying commercials. Special
Note:
To those not of the historical reenacting community, the terms "Farb" and "Farby" must seem very strange. These terms are used by the reenacting community to criticize clothing, weapons, personal gear and many other things that are not "period correct" or have modern markings on them that render them out of place and anachronisms. For example, it would be terribly "farby" to wear an Indian War uniform at a Civil War event or take a caplock musket to a Revolutionary War reenactment. Even when the viewing public can't see that something is "farby," that look can spoil the joy of owning such a thing if its "farbyness" is just too visible for its owner to ignore and (s)he's embarrassed by it. The highly visible stampings on the flintlock Trapper's barrel absolutely ruin its late 18th Century look, so, to make the pistol look "right," those stampings must be removed and the pistol thus "defarbed." This is the story of how I was compelled to take my Trapper pistol through an extensive "defarbation" process and my happy results. 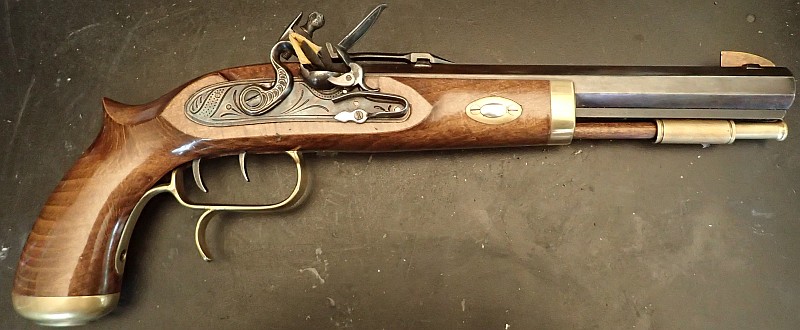 Perhaps a flintlock isn't everybody's "cup of tea," but for me, this pistol is both exciting to shoot and a pleasure to look at. With its "farby"stampings removed and the barrel traditionally browned, it looks like it came from the 18th Century. At black powder shooting matches or on display in my house, I am proud of the way it looks and shoots. Foreword
In writing this essay I am assuming you have a
Traditions
flintlock or you are thinking seriously about buying one or perhaps you
have a very similar
flintlock that you want to "defarb" and improve its lock. Let
me say
this at the
beginning, the
"Trapper" flintlock is perhaps the best there is for the money.
With
the Trapper you get
a very hansom, precision shooter who's barrel has excellent rifling,
but, alas, that barrel is literally covered with unsightly and
"farby" stampings, completely ruining the 18th Century
look.
And then there is the lock. If you have a Trapper
or similar pistol,
your lock probably needs
some detailed "tuning" to make it function well. I am assuming that you are familiar with the wonderful world of flintlock shooting or that you are eager to learn about it. If you do not have a flintlock at this point, you might be interested in reading about them in my flintlock page linked to at the end of this essay before you decide to buy a Trapper or any flintlock pistol, rifle or smoothbore. If you have a Trapper or are set to get one and you need to make it look and function with more authenticity and reliability, please read on. As I've warned in other black powder articles and stories, you should be aware that I am not a licensed gunsmith and there is nothing in the following essay that you may take as "expert advice." I hope that I have approached everything with common sense and with good and rational observations, but that is something you must decide for yourself. Since I am not a professional nor am I charging you anything, I am not responsible for your safety, especially if you don't understand what I am trying to say and you go ahead and do something foolish. If there is anything that you think is foolish or dangerous for you to attempt, don't attempt it, but write to me or seek out professional advice from a licensed gunsmith. Always error on the side of safety since the person responsible for your safety and the safety of those around you is YOU, yes you. The purpose of this essay is to tell the story of a powerful and generally well made flintlock pistol that had a lot of factory issues and had the worst looking "farby" markings on it, but I finally ended up with with a beautifully functioning and beautifully looking rifled pistol that could pass muster as a late 18th Century hunting pistol. This story is to entertain you and perhaps encourage you to do something similar if you have a similar rifle or pistol that you'd like to "defarb" so that you aren't embarrassed by all its modern markings and you want it to work as the well as the best flintlocks. If you find that I have made any serious mistakes or something doesn't work for you, please write me at my geojohn mail address and not in my guestbook and tell me about it. The last thing I want to do is spread bad information about black powder shooting because, quite frankly, there is already way too much of it out there as it is. I know that I have created a very wordy essay, but I hope it is an easy and fun read and it does have some nice pictures. Read what you want, skip around, look at the pictures. It's free, there is no password registration required and nobody is going to spy on you or charge you anything or make you watch annoying commercials, I promise. Introduction
Some years ago a good man went through a painful
change in
his life and was forced to simplify. This change involved
giving
away his black powder rifle and pistol collection and since we had done
a
lot of target shooting together and he knew how much I loved black
powder shooting, he chose me to HOLD his black powder arms for him
until such time he should want them back. Actually, he "gave"
them to me, but I consider them to be held in trust until such time he
wants then again or I am no more. Simply because I do not
consider them "mine" exactly, I have felt reluctant to modify them
except to
make them better. Having said that, I am not
ashamed of the significant modifications I made to my
friend's Trapper and I believe he would be proud of what I have done to
his pistol.Those of you who own one know that the Trapper is a hansom pistol with a nicely carved stock with good looking brass fittings, including a rather authentic looking brass bludgeon butt cap. The finish of the wood is superb and the lock mechanism fits perfectly into the mortise hole of the stock. The pistol is extremely powerful, throwing a heavy elongated bullet out of its rifled barrel with enough recoil to throw the pistol into your face if you aren't ready. The recoil surprised me the first time I shot the pistol with REAL hunting bullets and about 50 grains of FFG black powder. The danged thing nearly hit me in the face, but now when I shoot it I am ready and I only shoot about 40 grains of powder as a maximum load. As mentioned earlier, there were certain things I never liked about this pistol. First, on both sides of the barrel there was stamped the most absurd and lengthy instructions and warnings. I mean they were just horrible and extremely "FARBY" looking. With a whole Encyclopedia Britannica chapter stamped into the barrel, I was ashamed of the thing. 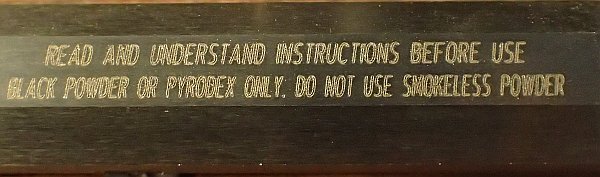 Ugly "farby" lettering on the left-top side of the barrel. Traditions ruined the 18th Century look with this ugly lettering right on top where everybody can see it. 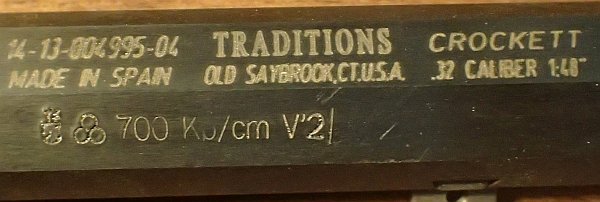 These stampings are so utterly out of place on what is supposed to look like a late 18th to early 19th Century pistol, I simply can't understand why Traditions put them there. Proof marks on the lower flat are mostly covered by wood so they weren't removed. By the way, this photo is of my Crockett pistol's stampings, but the Trapper's were almost identical. 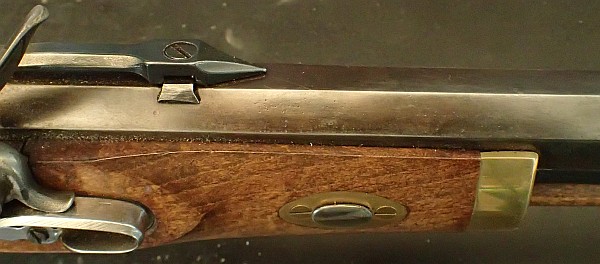 The farby lettering is gone and the barrel is browned per 18th Century. Of course, these aren't the only improvements I made to this pistol. Removing the "farby" markings
from the sides of the barrel
As mentioned, I really detested all the printing
on the
top sides of the barrel and I didn't like the blued finish so I
attacked that part of the project first. I took a small
hammer and I
peened down the stampings until the barrel was smooth and then I used
some rather coarse files to remove most of the printing.
After
the printing was almost gone, I
used a fine finishing file to completely remove the lettering and
scratches the
coarse file left behind and to get the barrel as smooth and shiny as
possible.
I have had some experience filing and polishing
steel and so this
barrel was quickly
filed with minimum scratching and my orbital
sander with medium grit paper removed scratches without creating new
ones.
After the
barrel was sanded relatively smooth, I began to hand sand it with very
fine sand paper (1000 to 2000 grit). After sanding, the
barrel
was reasonably finished but not
quite. I finished it with a polishing wheel with hard steel
polishing compound
to give it that "Armory Bright" finish
that looks so good on some 18th Century pistols.
By the
way, I have a really powerful
6'' polishing wheel that does a wonderful job. All this polishing took a long time, but I kept at it until I got the barrel looking right. Boy, what an improvement, I was so proud of the way the Trapper's barrel now looked with the farby stampings removed. A good set of files, an assortment of fine wet/dry sandpaper (600 grit to 2000 grit), a sanding machine and a powerful polishing wheel really helps, but even with those, the task is a long one (but very satisfying -- we all like bright, shiny things). By the way, when ordinary steel is polished this way, its surface is somewhat "passivated" and it is almost as protected from rust as a blued steel finish. I have found that a shiny steel surface requires no more attention and care than a blued steel surface to keep it rust free. The Trapper is a hunting pistol and so the brightly polished finish looked out of place. Finally I decided to brown the barrel. If the browning didn't look good, I could always remove it and re-polish the barrel. To brown the barrel, I scrubbed the barrel with a degreasing detergent and then rinsed it with purified water. Next I placed the barrel in a little turbo oven and heated it to about 250 degrees. When the barrel had baked and was hot through and through, I swabbed on the browning solution and kept applying it until the barrel was below the boiling point. I then scrubbed off the dried browning residue and polished the barrel with a stainless steel pot scrubber pad until it was shiny brown. I repeated the whole procedure until the barrel was the rich brown that I wanted. This brown layer is chemically very similar to the blue layer that gunsmiths apply. Both methods oxidize the iron and leave a "rusted" magnetite layer that protects the underlying iron from more rusting. In my humble opinion, browning is so hansom, I wonder why people insist on having their rifles and pistols blued. Going from a 'cheap' lock with poor performance to an excellent lock
Most people consider the Traditions locks to be cheap and
junkey and sometimes people will replace them with
much more expensive locks by Siler, L&R or some other fine
brand.
The fact is, the Traditions locks and internal parts are well
designed and are made of good metal, but nothing is hand fitted or
expertly finished (except the outside) and, believe me, it is as
important today as it was
back in the 1700s that lock parts fit properly. Despite the
vast
changes in machining made in the last 300 years, these are not
interchangeable
automobile parts, but require a precision fitting that can only be done
by hand.
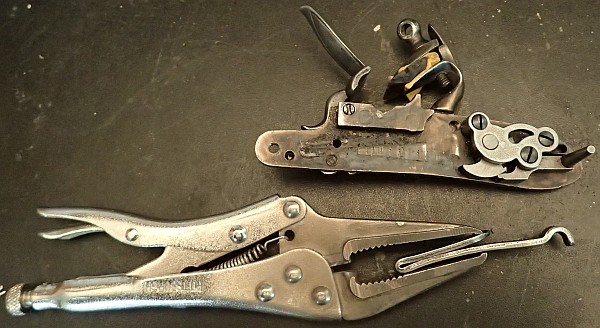
Nobody should be surprised (or disappointed) that cheaply made locks behave poorly because, to keep the cost down and make the Trapper so affordable, they must hire people with limited skills and give them little or no time to hand fit anything. I have the time, I have the tools and I have the experience to do a kind of gunsmithing that I really enjoy and so I have ended up with three Traditions locks that function as well as the best (in my opinion). Actually, the Traditions locks have good overall geometry and are made of good steel and it only takes a little hand fitting of parts to build yourself a first class lock. The first thing I did was to completely disassemble the lock to the last spring and screw so that all friction surfaces and hard surfaces could be accessed. When disassembling a lock, the springs must be very carefully compressed and then removed and that takes some thought and care and a tool that won't mar or break them. If you break a spring, shame on you, but it isn't the end of the world because replacements can be had.
After all the springs and their screws were removed, I started with the frizzen. Earlier I noticed that the frizzen did not throw good sparks and one reason is that it was gouged and appeared to be too soft. I love hardening frizzen faces and so I took this one and held it so that the flat striking surface was uppermost and horizontal. I then heaped hardening compound onto the top of the striking surface while making sure that there was compound especially at the heel where the hottest sparks are produced. I put the frizzen in the flame of my big propane torch and heated it to a bright red while the hardening compound sputtered and melted. I kept the frizzen in the flame until most of the compound was gone and then I added more compound and kept the heat to it. After several minutes of this kind of operation I figured that the carburation process was complete and there would be a thick layer of high carbon steel on the striking surface of the frizzen. While the steel piece was still quite hot, I steel brushed it clean. The frizzen was returned to the flame and brought up to a bright red color and then quickly plunged into cold water and swished around to give it a very hard striking surface that would produce excellent sparks and would not gouge. The second thing I did was to grind off some steel from the underside of the front of the frizzen where it rests on the frizzen spring when the pan is open. I did that so the pan would open wider for ease of cleaning and especially so it would be more exposed for priming. Originally, the pan would open very little, it was hard to get powder in there and I couldn't easily see how much powder was in the pan or if the touch hole was clogged or not. Removing a little metal in this way greatly improved access to the pan when it was open and I could then see that the pan itself needed to be slightly deepened and made wider. To tell the truth, I got the idea from my 1777 military musketoon which has a pan that opens very widely indeed so that soldiers could see what they were doing and prime the pan quickly. The following
photos and close-ups are of a lock that is very oily and dirty, but not
so dirty it doesn't function well.
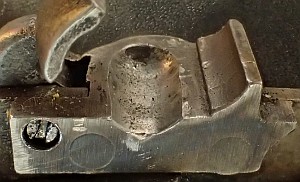 The pan after making it wider and deeper. I took my small grinding tools and widened and deepened the pan so that the sparks have a larger powder surface to catch the burning steel particles and being a bit deeper, the touch hole is now located where the hot gases from the primer charge can get into the touch hole and set off the main charge quicker. The next thing that needed help was all the friction in the rotational part of the lock itself. I noticed that if I would screw down the bridle inside the lock, everything would freeze up and the tumbler would not rotate. Obviously the tumbler and the inside of the bridle would have to have metal carefully removed so that the binding was gone when the screws were tight. I carefully filed just very small amounts of steel off the bridle's underside and the tumbler inside and outside surfaces paying great care to remove the uneven surfaces and make everything flat. The tumbler went in and out of the bridal several times until the fit was perfect and then I brightly polished all the surfaces. Actually the tumbler is a well made piece of steel and most of my work was on making the lock plate and the bridle surface flat. 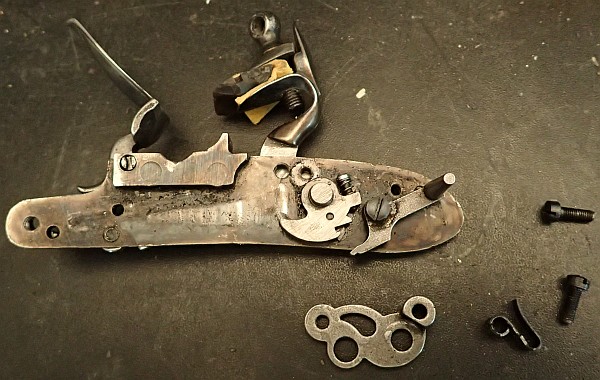 Tumbler, bridle and screws. With the bridle screwed down tight, the tumbler should still rotate freely. Note that these are well made parts and their layout geometry is excellent. They only require a little hand fitting to enable them to function perfectly. The next thing that needed attention was the trigger mechanism. These locks are blessed with a screw adjustable full cock sear on the tumbler so that you can adjust it for a heavy trigger pull or a very light and crisp trigger pull. You know, they really don't need a second "hair trigger" mechanism because the main trigger can be made to operate very well, but for a hunting pistol that will be carried around and may be at full cock for extended lengths of time, perhaps it is best to adjust the main trigger sear all set up for a heavy pull and rely on the second trigger to give you that extra accurate "hair trigger" only when you cock it for target practice. Use the main trigger when out in hunt country and the hair trigger mechanism when doing accurate target shooting. 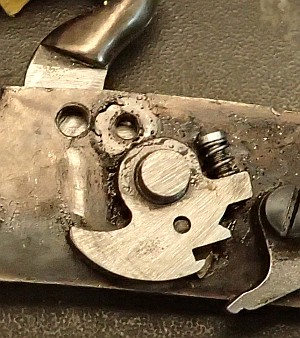 The spring loaded screw on the tumbler works to allow the main trigger to be adjusted for a strong trigger pull all the way to a hair trigger. A medium trigger pull is both safe and proper for use with the "second setting trigger" which is a hair trigger for target practice. The "fly" is in back of the tumbler in its recess and is not shown in this photo. I apologize for how dirty with powder residue everything is, but it is oily residue and lubricates well so that everything operates well Before I began adjusting the trigger mechanism and loosening up the tumbler, the "hair trigger" mechanism was all but useless. In order to work at all it had to be adjusted so tight that it was nearly impossible to "set" and when you did use it, it would hang up the rotation of the cock so that the sparks were very poor in this mode. Getting the tumbler to work properly went a long way in fixing this problem as did adjusting the main trigger sear screw on the tumbler, but it still had a serious hang up because of the "fly." The little tiny piece of steel that is the "fly" in the tumbler was not quite right and it caused the tumbler to stick. This slowed down the rotation of the cock and prevented the flint from striking the frizzen hard enough. When using the main trigger only, the shooter naturally keeps the trigger back and the half-cock sear and the fly doesn't come into play. So, using the main trigger only, the flint rotated down fast and hard enough to get good sparks off of the frizzen face, but would hang up and produce poor sparks when using the hair trigger mechanism. To cure this, I took the tiny "fly" out of the tumbler and polished it and I polished the surface on the trigger sear part so they glided over each other with little friction. To make the operation very smooth, the tumbler and fly were rotated through many cycles past the half cock point until the fly worked perfectly and no longer caused the tumbler to hang up. Now the cock rotates down without any hitches and the lock produces good sparks when using the hair trigger mechanism, sparks just as well as when using the main trigger alone. Conclusion
When everything was the way I wanted it, I
reassembled the
lock and reinstalled the mainspring. One nice thing about the
Traditions locks is the springs are very easy to get to and easy to
compress without taking any chances of snapping one. Once
together and with the frizzen deeply hardened and the flint sharp and
correctly placed in the jaws of the cock, the pistol produced a fine
shower of sparks and what is more, when using the "hair trigger"
mechanism, the shower of sparks is just as good. With the
Traditions
lock now working as near perfect as a flintlock can, there is no reason
for me to even consider getting an expensive lock for this pistol.I have remade the Trapper pistol into something that functions far better than the original and, what is more, it looks far better than the original and I am not ashamed to show it off. If you have mechanical skills, some simple tools, hardening compound and aren't afraid to tackle projects of this sort, you might want to do something similar to your Trapper and if you do, please let me know at my geojohn mail address. THE END
If you enjoyed this flintlock story, you might also be interested in the following articles and stories.  My French model
1777 cavalry musketoon flintlock
After some extensive, but very fun work correcting a lot of minor things, I am very proud of this gun.  Paul's original Brown Bess I rebuilt All modesty aside, I am very pleased with how this gun turned out.  How I converted two "Crockett" caplocks pistols into a pair of beautiful 18th Century flintlock "dueling" pistols that I am very proud of.  Shooting the flintlock There are lots of other firearm articles one of which you might be interested found in my shooting articles selection page
If you have any detailed comments, questions, complaints or
suggestions, I would be grateful if you would please
E-mail me directly There are lots of other things here you might be interested in and no commercials Please go to my Home Page for more exciting adventures. |